Melissa Shirley Wicked: final thought

See what happens when I get busy or distracted. I had been writing this post for the week of May 15-20 and I got distracted or sidetracked and now here it is almost Memorial week-end and I am just coming up for air. So here is the final thoughts on Wicked…

After the stitching is completed then the piece has to be finished. I know I have been showing how to finish needlepoint but last year I was not up to the task of finishing. That’s my story and I’m sticking to it…Seriously, I can do ornaments and some other little stuff but really haven’t had the time to try the biggies. One day I am going to try a pillow and a purse but for now I’m going to send big pieces to the finisher. I can’t even find time to sew a button on, let alone make a blouse or finish big needlepoint or for that matter any needlepoint.


I knew where I wanted to hang “Wicked” and how I wanted it finished. I drew a picture for the finisher and once the material was purchased I sent it to her to do her magic.  I was very pleased with the way it was finished and I love to see it hanging at Halloween.

To some people finishing a piece of needlepoint is easy; they take it to a trusted shop and have it finished. Not me, I agonize over finishing. As I am stitching I can see the finished piece, I get these pre-conceived images in my head and then I feel like I need to look for the material to finish the project. Nice for me I know the finisher and I can as her if my idea will work. If she says yes, then I’m off to look for material.


Now, let me give you the advice I seldom ever follow but every finisher I know will tell you is the truth.

You should buy the fabric for finishing before you ever start stitching.

I know, seems illogical to me too, but remember we are limited by out thread choices and the fabrics we choose to  finish our pieces are limited by their color choices. Now I will admit if you go to Hamilton Mo or any large quilt shop, you should be able to find a fabric. But what if you want a velvet or moiré for that Christmas stocking you are spending hours stitching? There is a world of difference between DMC 666 red and DMC 321 or 498 red. And fabrics only come in certain colors. And yes, you could use green for the backing and lining, but there are different greens too. So, if you want as perfect a match as you can get; sometimes it is important to buy that fabric first.

And while we are talking “you buy the fabric”; remember that if you want self-cording you need extra fabric. Self-cording is cut on the bias of the fabric and will require more fabric. Just as local needlepoint shop or finisher how much fabric you will need to finish your piece.


And some shops stock fabrics for finishing, so ask before you head all over the countryside looking for that perfect fabric. Some finishers have fabrics stockpiled and if you ask the shop you use, they probably can tell you which red would be best on that stocking or they can ask the finisher for you.


I’m lucky we have several very nice fabric shops in the area. Sarah’s in Lawrence (http://www.sarahsfabrics.com/), and several quilt shops in the area, plus Hamilton, Mo (https://www.missouriquiltco.com/). I’ve been to Hamilton twice now and while it is both eye candy for the imagination it can be overwhelming also. Hamilton is quilt town in northern Missouri, aka Missouri Quilt Co; Google it or read my post from last year…


A word about finishers… Have you ever wondered why so many shops guard their finisher’s name so closely? The real reason is that they are not trying to keep her a national secret, they are trying to protect her from the thousand calls she would get during busy times of the year asking, “Is my ornament finished yet?” And that is why finishing deadlines are so early. I think a finisher told me one time she finish over 1000 ornaments for Christmas and that didn’t count the stockings. Keep in mind blocking boards can only hold so much and sometimes pieces need to be blocked more than once and sometimes needlepoint even needs to be cleaned before blocking may begin. (This is another blog…but stitching in the hand vs stitching on a frame does have its drawbacks as well as its advantages…I will put this on my list of things to write about.)


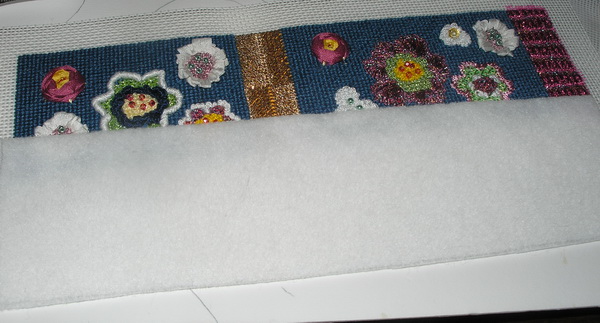
Back to “Wicked”… I found the fabric and Batik at Hamilton and bought it. Brought it home and took it to the shop for my finisher to pick up (No, just because I know her doesn’t mean I don’t have to take it to the shop. My finisher will not accept pieces except through the shops she does finishing.) I took the piece about mid-May and I got it back about mid-August.


What took so long? Mine was not the only finishing in line. Mine had to be blocked, just like the rest and maybe twice I didn’t ask; and it’s a pretty big piece so it took up some real-estate on the blocking board. Mine also only had the green material supplied, so my finisher had to get the black for the inset, thread and even the interfacing. I could have purchased the black but I didn’t think about it at the time and she suggested this after she saw the piece…that’s another reason you use a finisher…She’s seen enough pieces to know what looks best even when you limit her by you pre-conceived finishing. And I had no idea what interfacing she would recommend. So see, Finishers do more than finish; they make your needlepoint look just like you want, and they know from experience what works best.

When “Wicked” returned home, it was just what I envisioned and more. I hung it and hated to see Halloween come to an end. I sometimes think I stitch long hours for a piece that only is displayed for a short time but I like it and it brings a smile to my face. And I hope it will be around for many years to come, maybe even one of my Grandchildren will want it when I am gone. Sometimes I get it out in it’s protective bag, and hand it on the door of my office just to look at it…it makes me smile.

Oh and before I forget; what do I do with the stitch guide after I complete stitching the canvas? I destroy it; it is a copyrighted piece of work.  And in my opinion, stitch guides should not be bought or sold without the purchase of the canvas! I have done two or three stitch guides for canvases and I will not sell them to individuals only to shops where I assume the canvas is purchased.

I know a stitcher who saves her stitch guides as a reference and that’s fine but I don’t want all the extra paper. I might make a note in my computer or my stitch notebooks I keep about a technique, stitch pattern or stitch but my stitch guide goes to the trash. I do not share it with my stitch friend who bought the canvas only because she liked mine. I destroy it. Enough said…my soap box stand for the week.

On another note…my family is having a garage sale…no needlepoint but I do have needlepoint books I have accumulated over the years. I will list them here next week with cost and then I will put them on Needlepoint Nation Stash after that.

Thank you for stopping by, I hope you have time to stitch today and over the holiday week-end. AND please don’t forget to honor those you know who are serving or have served in our military. Without these brave men and women we would not enjoy the freedoms we take for granted.

ttfn…sue

3D Finishing: Melissa Shirley Sewing Bird Part 2

Materials used:

Stitched and blocked needlepoint pieces
2 Copies of each stitched, blocked pieces
Backing fabric: I used two
Ultra-suede for the wings
Cotton for the rest: fat quarter would be ample
Batting: low loft for wings and body
Batting: craft weight for sides and body
Fiber Fill
Sewing thread to match fabric
Illustration board
Paper scissors
Glue
Cording
Usual sewing supplies

Like I said last week, the body gave me some trouble. I spent at least three days trying different methods, losing my cool, and becoming more frustrated.  I had thought I could finish these two pieces as I had finished the sides but trying to sew the lining to a hard piece of illustration board smoothly did not work.  So since I had cut out a first lining and clipped curves I trashed that lining and cut a second. I also tried to stitch the needlework to illustration board and it proved to be not only not smooth but bulky too. Luckily I had left a lot of canvas and all I had to do was trim a bit more.

I used a lightweight piece of batting (cut two for each side…you will use the other for lining)  to separate the needlepoint canvas from the illustration board and the since I had already somewhat clipped the curves I trimmed and clipped the canvas again and GLUED it to the illustration board.  This was about a three day project since I first tried to lace the needlework to illustration board; then I had to undo, fume, fume some more, cut another piece of illustration board, still fume, and then give in to the little voice that kept saying “glue.” I figure if I keep saying “glue” it will get better.

Truthfully I am not a glue person, but I also know most of my needlework is not going to the Smithsonian; most of my needlepoint will be lucky to survive two to three generations. I have one piece that is registered with the Smithsonian and that is my White House needlepoint stocking but in all fairness all White House collections are registered with them; they are the storehouse and inventory control for all collections.

So when all else fails…glue. Yes, I said glue, but I had already used all the other four letter words I knew and to keep my sanity and finish this project, glue was the answer. I glued the needlework to the illustration board.

The second piece of batting needs to be trimmed to be about an 1/8th inch smaller than the needlework.  Then I clipped the curves, pinned the lining to the batting, and stitched it in place.


Next I pined and stitched the linings to the front pieces.

Then I assembled the front piece to the side pieces and pinned together. Here is why the lining pieces are a bit fin30a inside of friendssmaller than the needlepoint. If you’ll notice on my friend’s piece the inside looks like the lining fits snuggly together, but it didn’t look stitched, just snuggly fit. So I made my linings just a tad smaller so they would fit somewhat like these too.  That was the easy part, next came stitching. I stitched the pieces together; sometimes I had to use my trusty third hand (needle-nosed pliers) to push or pull the needle between the threads of canvas. Stitching the angles and curves took some times and since I was going slowly this took another day.

Then I made a bottom for the stitching bird.  Again I had a picture of my friend’s fin33a bottom of friendsand I knew it needed to recede.  I cut a bottom and trimmed until it fit, covered it with lining fabric and stitched in place leaving the four corners unstitched so I could hide the ends of the cording in the bottom.

Made cording for the sewing bird; two long ones to go around large bird pieces and two small pieces to fin35b  together cord allcover the side ends. Pinned the side pieces on first and stitched into place; I hid the ends in the linings as best I could then sewed the large pieces around the bird hiding the ends in the bottom. Here is a blurred picture of the direction of the larger pieces of cording around the face of the birds. Again used my third hand a few times , but finally could see the light at the end of the tunnel. Almost finished ;-)!


Oh those #### wings. I thought I had a curved needle to sew these in place but my curved needle I think is an upholstery needle and will leave holes not only in the wing but the bird too. Need to see if what other curved needles are available. Thought about gluing them on but just could not bring myself to do this. So for now I have used  silk pins and pinned them in place for now.

Finally a finished sewing bird! Many hours, many choice words, a bit of glue and I have a stitching bird to add to my sewing tools collection. I also will have a fond memory of a stitching friend who is no longer with us, she loved birds.  And one more thing, this project took me less than a year to complete, I started August 5, 2015  and it is completely finished…trust me I have projects older than this still not yet stitched and more projects stitched but not finished.

Do you have unfinished stitching projects? Why? Did you lose interest in stitching? Or after you stitched it, were not satisfied enough to have it finished? This is probably another thought for a blog post. Send me your thoughts and I’ll mull this one around.

But the one thing I did learn from this project is that when that little voice in your head tells you you are in too deep…listen!  I wish I had listened to that little voice in my head that said, “Send it to the finisher.” I would have saved myself a lot of anger and frustration. And yet now that the project is completed I do feel accomplished…even if I would not do it again!

Thank you for stopping by, I hope you have time to stitch today!

ttfn…sue

3D Finishing: Melissa Shirley Sewing Bird Part 1

Materials used:

Stitched and blocked needlepoint pieces
2 Copies of each stitched, blocked pieces
Backing fabric: I used two
Ultra-suede for the wings
Cotton for the rest: fat quarter would be ample
Batting: low loft for wings and body
Batting: craft weight for sides and body
Fiber Fill
Sewing thread to match fabric
Illustration board
Paper scissors
Glue
Cording
Usual sewing supplies

20160712 a bird yellowI have contemplated how to finish this piece for weeks/months. I should have listened to that little voice in my head that said, “Send it to the finisher.”  But no I just kept looking at it and I had a friend who had stitched one (she sent hers to the finisher) and I figured I could manage this myself. Afterall it was just a stand up without the stuffing… and ornament in 3-D…I can do this.

I had it on the blocking boards for a long time while I mulled over finishing in my mind. Then I got brave and began the process. I mad two copies of each of the blocked pieces.  And then I plunged in…I felt like a kid jumping off the high dive for the first time. Once you get up your courage to climb that ladder you gotta go off the diving board; if you climb down…well you all know what that means when you’re a kid. So off I plunged…

Once I took the plunge it was a long way down to the finish; this project took me at least two weeks to complete. I would breeze right along and then I would hit a rough patch and it would take me a couple days to get through it. I’ll let you know as we go along where, when and why I became frustrated.

blockingI had blocked the pieces. Even though I had stitched the designs on Evertite stretcher bars I still block. I do know some people who adjust and tightened their Evertites and block using them too but I do not.   I use my Marie’s blocking board (if any one has one they don’t want, I will pay to have it shipped to me.)

I also made two copies of the pieces on the printer/copier for patterns. Remember copies of copies are a bit smaller, I think the standard is about 97-98% smaller; so when you make a copy of your stitching it is already a bit smaller.  And sometimes I use more than one copy and so I have a second in reserve in case I need it. It is hard to make a second copy once you have started or cut the first copy.

I started finishing the wings, they were easy; they were like a soft ornament.(see: https://sudukc.wordpress.com/2016/03/23/finishing-ornaments-3-soft-ornaments/) I cut out one of the copies for a pattern of each wing. I colored the edges with my Copic pens (https://imaginationinternationalinc.com/copic/), I don’t like grin through.

I trimmed the canvas to within a 1/2 inch of stitching and clipped the curves.  I finger pressed to the back and used Clover clips to hold in place.  These clips come in several sizes, I like the green jumbos best (http://www.joann.com/clover-12pcs-jumbo-wonder-clips-neon-green/14789036.html). I buy them at JoAnns with my $$ off coupons.


I stitch the canvas to the back with a double waxed sewing thread. Always wax your thread…it makes it stronger and it keeps it from twisting and knotting.

I used a small piece of ultra-suede I had to back the wings; I used each stitched wing to cut a backing fabric. I marked the stitched needlepoint onto the wrong side of the fabric and clipped the curves. I cut two pieces of low-loft quilt batting using the patterns I made for the wings. I used one of the quilt battings to stabilize the backing fabric and to give me something to fold the ultra-suede back onto and it also gave me something to baste the fabric in place.

Then I sandwiched all together: needlepoint second batting and backing and pinned together. I stitched the wings. I also decided that there was not enough dimension to the wings so I stuffed them with fiber-fill. I didn’t think I filled them too much but they proved to be a problem later on.

I also made a small cording, joined and stitched it around the wings…The wings were completed and truthfully I think this took me a couple days, but they were no problem.

Next I finished the side straight pieces; one short and one long…these had the decorative flowers stitched on them. I used pretty much the same method I had used finishing the wings without the fiber-fill.

Using the patterns I cut batting for large and small side pieces. I cut the needlepoint to within 1/2 inch of stitching.

I finger pressed the edges to the back mitering the corners around the craft weight quilt batting, pinning in place.

Using a double waxed length of sewing thread I laced the sides together,  starting in the middle and working toward ends and stitching the mitered corners.

Then I cut backing fabric 1/2 inch larger that the needlepoint. I finger pressed and pined to be just slightly smaller than the finished needlepoint. I pressed this in place with my new gadget I purchased some time ago to help with finishing. It’s a Clover Mini Iron with all sorts or attachments. It has a large and small iron head, a ball head (I think for curves, a long thin head (probably for corners and a cutting knife. And I doubt I will ever use the cutting knife since I do not want to gunk up the iron for finishing.

The reason that I stitched these slightly smaller than the needlepoint is because when I assemble the pieces together I am going to join them together through the needlepoint and therefore the lining needed to be slightly smaller because it will be inside the bird.

I stitched the backing to the needlepoint using a single waxed thread.  These pieces went quickly and I thought I was on a roll; then finish came to an abrupt halt.

The bird body gave me some trouble and so if you don’t mind I am going to continue this saga next week., otherwise this post will be way toooooo long. I can give you a hint…I did finish this bird but it took me the better part of a week, a few well-chosen words and a do over. But for now…

Thank you for stopping by, I hope you have time to stitch today!

ttfn…sue

Finishing: ornaments 3: Soft ornaments

Shaped ornaments may be finished with illustration board but I find it easier to finish them as a soft ornament. Any shape , even square or round may be finished using this method. These ornaments take a bit more time because they are hand stitched, no glue here.

Stuffing is a personal thing; some prefer tightly stuffed, while others like softer ornaments that are not stuffed as much. Whichever type you prefer, remember to use small amounts of fiber fill. Use a chopstick (reason to eat out) to push small amounts of fiber fill in to the nooks and crannies of shaped ornaments. My personal preference is somewhere between medium firm to firmly stuffed, squishy ornaments are not my thing.

Materials List:

BLOCKED Needlepoint

Copy of blocked needlepoint

Lining (optional)

Fabric Backing

Iron-on Pelon  or fleece: medium weight

Hanger (optional) Can use cording

Sewing thread to match Needlepoint and/or backing

Cording

Chop Stick or pointed tool

Usual sewing supplies

Step 1: Make a copy of your needlepoint on the copy machine and cut out.


Step 2: Lay copy right side up on the non-iron side of the pelon and draw around cut out copy.  Place on fabric backing for the ornament and iron to backing.


Step 3: Trim ornament to 1/2 inch and clip. Finger press the canvas to the back side of the needlepoint and hold in place with pins.


20160323 OrnSoft 4Step 4: With a long waxed thread tack the excess to the back of the needlework with running stitches. Be careful not to take the stitches to the front of needlepoint canvas.

Step 5: Repeat this process for the fabric backing, checking to be sure that 20160323 OrnSoft 5the fabric backing will match the needlepoint canvas. Be sure the running stitches are only tacked to the pelon or fleece.

Step 6: Optional. I used a hanger I bent to fit as a 20160323 OrnSoft 6hanger  to fit the sweaters.  I attached this to the needlepoint side of the canvas with basting stitches.


20160323 OrnSoft 7Step 7: Pin the needlepoint to the fabric backing.

Step 8: With the back side facing you (don’t ask me why…it’s just easier) and a waxed thread, ladder stitch the front to the back. The ladder stitch catches canvas 3-4 threads on the needlepoint and then 20160323 OrnSoft 8 ladder stitch graphicabout a 1/4 inch in the fold of the backing fabric. Pull this stitch snuggly, drawing the canvas and backing together. Do not for get to leave an opening for the ends of the cording and a place to stuff. Note the sweater ornaments had two openings; one at the hanger and one I left at the bottom to use for stuffing.

20160323 OrnSoft 11Step 9:  Using small amounts of stuffing, stuff the ornaments to the desired fullness. Use a chop stitck, small knitting needle or any pointed instrument to stuff; poking small amounts of stuffing into small places and corners. When stuffed to desired fullness, 20160323 OrnSoft 10close the hole with more ladder stitches.

Step 10: Make a cording to match or blend with the needlepoint. Attach to needlepoint hiding the ends in an opening left for this purpose.

OLYMPUS DIGITAL CAMERA

Step 11: With back side (backing fabric) toward you stitch cording to canvas with 1 strand of waxed thread. This thread should match the cording and if multi colored cord match fabric backing, whatever is most inconspicuous. Stitch through the cording, NOT over the cording. Stitching over the cording creates dimples in the cording that are not pretty.

Enjoy your finished ornament.


There is another type of soft ornament finishing and that uses fleece. These ornaments are not stuffed but rather stitched with fleece layers between the front and the back. I find this a great way to make a scissor fob…

It is finished very much the same way the above ornament is done:

Materials:

Blocked needlepoint Canvas

Backing material

Fleece

Thread

Cording

Step 1: Cut needlepoint canvas to 1/2 inch from needlework, angle corners.

Step 2: Finger press to back of needlepoint and pin.

Step 3: Cut fleece just a bit smaller then needlework and attach with running stitches being careful not to go through to the front of the needlepoint.

Step 4: Cut backing fabric 1/2 larger than needlework. Also cut 2 more pieces of fleece 1/8 to 1/4 inch smaller than needlepoint.

Step 5: Finger press and pin into place, mitering corners.


Step 6: Stitch needlepoint to fabric backing using ladder stitch method. Remember to leave opening for cording.

Step 7: Making cording and attach to needlework.

OLYMPUS DIGITAL CAMERA

Enjoy your new scissor fob. Hint you can also use to park needles.

This will be all the finishing for a couple weeks. Today as  I am having total knee replacement and will be rehabbing for a few weeks. But I look at it this way, I will have a good knee to keep me on my finishing quest.

AND I am going to have some great stitching time! 😉

Thank you for stopping by, I hope you have time to stitch today!

ttfn…sue

Finishing: ornaments 2: square or rectangle

As you probably guessed by now I am a glue person. I can lace a piece of needlepoint, I have and I will again but sometimes I just have too many ornaments to finish at one time. See the carrots from a few years ago (https://sudukc.wordpress.com/2011/04/26/recipe-for-finishing-carrots/) that was a production. And truthfully I would much rather have my Grandchildren carry around their ornaments in their sticky little hands (although I would prefer they didn’t have sticky fingers…but you know what I mean). The look of delight and love in their eyes when they see their favorite ornament is worth far more than any museum could ever offer me for a piece of my needlepoint

Today is finishing square and rectangle ornaments…there are only two differences between round /oval ornaments and square/rectangle ornaments. You don’t have to clip curves, there are none but you do have to miter the corners. It’s a trade off and personally I think the  round/oval is easier but I also like the look of the square/rectangle. And I really make more square ornaments than round ones…geometrics usually are square.

Again RULE ONE is having all materials at hand. I can’t emphasis this enough and trust me you will get frustrated if you have to stop and go to the craft store to purchase something (been there, bought that T-shirt many times).

Let’s get started.

Finishing:  Square/rectangle ornaments using illustration board (glue method)

You will need:

Blocked ornament (all needlepoint needs to be blocked)

Backing material

Lining material if needed

Fleece:  I use one about a 1/4 inch thick.

Illustration Board: medium weight

Glue:  use archival save glue please

Clips to hold needlework and backing fabric

Sewing thread to match backing and complement needlework.

Beeswax

Sharp needle

Hanger (can use cording) another post…

Usual sewing supplies: pins, scissors, clips etc.

1.I press the backing fabric to get the creases out, if lining ornament (you only need to line an ornament if you did an open background stitch or your design has large open areas (not stitched).

2. Measure ornament and cut out illustration board cutouts; cut two same size: one for needlepoint, second for backing. I usually make these a tad smaller than the measurement; this is not an exact measurement, it is really by trial and error method because it actually depends on how much padding you use. Example:  needlepoint measures 3 inches x 3 inches, I make the illustration board about 2 7/8 inch by 2 7/8 inch.

Make sure these 2 cut outs are the same, trim if necessary. I mark mine with an up arrow so I know how they are to be put together.

3.Cut quilt batting; I usually use two for the back and three on the front. Number 1 is cut about 1/4 inch smaller than illustration board; number 2 is cut 1/4 inch smaller than first; and number 3 is cut a 1/4 inch smaller than number 2. You can do this as many times as you want, but four is about the most I’ve seen.


4.Cut backing fabric 1/2 inch to 3/4 inch larger than the illustration board.


5.Cut needlepoint 1/2 inch to 3/4 inch larger than the illustration board, trim corners diagonally. If using a lining for needlepoint cut this too. For ornaments on illustration board I use the same size lining fabric as needlepoint and you will aple the lining first and then repeat the same process for the needlework.


6.I glue the quilt batting to the illustration board with a dot of glue to hold in place. Start with smallest cut batting and largest batting goes on top.

At this point if your needlework need lining do lining first and then repeat with needlework. You do not need to finger press the lining fabric.

7.With wrong side of needlepoint (lining fabric) up, Finger press the corners and sides. Place illustration board over needlework.

8.Place a bead of glue on back side of illustration board at the corners. Start with the corners, turning them in to start mitered corner. I usually do one side and then the opposite side. It is important to keep design centered on the illustration board. Allow to set.

9.Run a small bead of glue along opposite edges of the illustration board and turn needlework bto the back , finish mitering the corners and secure in place with clips until set.

10.Repeat steps #6-7-8-9 with backing fabric

11.When set remove clips from needlepoint and backing illustration boards.

12.Attach purchased hanger if desired or can make from cording.

13.On wrong/back sides of illustration board place thin layer of  glue over the backs of the illustration board;. Keep glue about 1/4  inch from edge as I don’t want any seeping out. Leave an opening to place the cording ends between the layers. Place two canvases together and secure with clips. Allow to dry completely.

14. Make cording and attach with pins. Hide one end in the opening left in Step 12 and when finished placing cording, hind second end.

15. With back side (backing fabric) toward you stitch cording to canvas with 1 strand of waxed thread. This  thread should match the cording and if multi colored cord match fabric backing, whatever is most inconspicuous. Stitch through the cording, NOT over the cording. Stitching over the cording creates dimples in the cording that are not pretty.

Notice that I do not glue cording! I guess you could if you’re good but I personally like to sew my cording.

16. Enjoy


Lacing Method is the same except that you turn all to back and hold in place with clips or pins. Lacing should begin in the middle of a side and proceed to 1st miters. Stitch the miters as you go around.

Thank you for stopping by, I hope you have time to stitch today!

ttfn…sue

Finishing, the beginning…again:

I have started on my project for the year…I will have my needlepoint finished this year! I am going to do it myself or send it out.

I must tell you that I have great anxiety over trying to finish large stand-ups and pillows. I have these visions in my head of boxing some stand-ups and pillows and I have NEVER made a pillow in my life. This may be a real learning experience, but that is down the road and we won’t worry about it now because we are going to start with things we know and work up to the big things.

Okay some thoughts before we begin…

Washing Needlepoint:

Should your needlepoint need washing, I would have the piece professionally done. I am always afraid of wetting a canvas too much and having threads bleed. “Orvus” seems to be the recommended thing to use if you are going to try and wash your needlework.

I personally think an ounce of prevention is worth a pound of cure. I wash my hands before I stitch and liquids around needlework is an accident waiting to happen.  I keep my drinks a few feet away from my needlework and my computer…two reasons: 1. Liquid and computers or needlework do not mix. And 2 I get my exercise getting up to walk to my drink…that’s not to say I have not left many a cup of coffee to get cold, but it’s not going to hurt anything either.

Blocking:

Blocking is essential. Even if you stitched on a frame and your needlepoint looks perfectly straight, it needs to be blocked. Blocking is not easy and if you do not have a blocking board I suggest you get or make one.

I wrote about blocking 2 years ago (https://sudukc.wordpress.com/2014/07/09/blocking-is-not-for-sissies/) and sad to say most of those needlepoint pieces in the top picture are not finished today. All I can say is I got sidetracked or it was just too overwhelming for me then.

14-06-12 blocking boardBut back to blocking boards.  I have one, it is a Maries Products 4 square blocker, and if I can ever find another at a reasonable price I will purchase it too. I love this blocking board. It works well for me. I use roofing nails to secure the needlepoint because roofing nails do not rust. I sure wish someone would 14-06-12 nailsmake this product again.

And not all blocking boards are suitable for needlepoint. Needlepoint blocking requires that you use heavy duty tacks or rust-proof nails to block needlepoint. Foam or vinyl boards are not heavy enough to block needlepoint.  Cardboard mats with ruled lines may work for canvas that is lightly distorted, but I would put a piece of clear vinyl over any thing I use to keep a safety net between the board and your needlepoint.  These cardboard mats may not last long either since you will be using roofing nails to hold stretched canvas in place.

You can make a blocking board using a piece of drywall covered with several layers of fabric. I would start with 2-3 layers of bleached muslin attached to dry wall with a staple gun. Over this I would use a piece of gingham fabric (woven not printed…Woven gingham will have straighter lines) with 1 inch squares in a light or pastel color. Attach gingham with staple gun using a right-angle triangle or T-square to keep lines straight. Over this I would place a clear piece of vinyl just to add that layer of prevention and prevent bleeding of the gingham. Of course you could prewash the gingham to see if it does bleed.  This board will have to be replaced also.  I understand you can use a piece of pinewood too, but this would require you hammer the nails into the board and it would have to be replaced too.

I have also known people who have blocked needlepoint on their ironing board using T-pins. I think these needlepoint pieces must have not been out of shape much.

Whatever method you choose, needlepoint should be blocked!

Before you block:

Whatever you use there are a couple things you need to do before you block any needlepoint.

14-07-09 Blocking remove tape & selvagesYou need to remove the selvage of canvas if it is still on your canvas.

You need to remove the tape from the canvas…you really should do this as soon as you are finished stitching. Tape is not good for long term on canvas.


Blocking needlework :

I am going to repeat here what I wrote two years ago (https://sudukc.wordpress.com/2014/07/09/blocking-is-not-for-sissies/)


if your canvas still has the selvage on it cut it off…hopefully this will still leave you room to block piece. If not, for now just clip through the selvage like you are clipping a curve, block and then remove. And shame on the designer or teacher who put her design too close to the selvage.


Blocking is hard on the fingers and the fingernails. You have to pull the canvas taut. I start to pin my needlepoint in the upper right corner. I pull the canvas taut and pin the top first (it does not matter whether you pin across the top or down the right side first whichever you prefer) The two things that are important are that you pull the canvas taut AND you pin in the same ditch, channel, between two parallel canvas threads (straight line) across the canvas. Next I pin down the right side, pulling taut and following a straight line. Next is the left side and then across the bottom Sometimes my bottom pining will be off a canvas thread or two, but what matters is that the canvas is square with no waves or puckers. Adjust pins by pulling canvas if you have waves or puckers.


To dampen or not…NEVER if silk or overdyes are used. I have a steamer and a mister but unless badly distorted (you must not have used your stretcher bars…shame on you) I seldom use water on my needlework. If I do, I put a towel under the blocking board and I mist very very lightly and leave the blocking board lying flat. You are going to love this reasoning…it makes no sense but it makes me feel more secure…I think if the board is flat and the color is going to run it will run down and not sideways. I told you it makes no sense but it makes me feel better. The other thing I have found is if I dampen needlework I have to adjust blocking the second time.
Okay needlepoint is on the blocking board and I leave it for a day or two, or three, or more…I check it after 24 hours and if the needlework is puckering I adjust the tension by unpinning two sides (bottom and left) and re-pin pulling taut. I leave blocked needlework on the blocking board until I get ready to finish and trust me I have had needlework on a blocking board a long time
. (Editorial note: No Kidding)


Another thing I want to mention here is if you have a piece that is badly distorted, I recommend two things:

1. Have it professionally blocked
2. Immediately find someone who will lace it for framing.
And know that over time it is going to distort again…unless of course you are planning on putting it in a museum where they can climate control it and keep it from the real world. And never let someone talk you into glue for the back or using pelon on the back… needlepoint is stronger than both of these and you will just have a mess.

14-06-18 supplies AOkay your piece is blocked and ready for finishing. Like stitching this requires some planning. It is necessary to have the proper tools and all the finishing supplies handy. Read this old my blog for these supplies they have not changed. 14-06-18 supplies B(https://sudukc.wordpress.com/2014/06/18/ufbsunfinished-but-stitched-supplies/)

Next we will finish ornaments…I’m good at small stuff.

Thank you for stopping by, I hope you have time to stitch today! I stitch even if I am finishing too…never want to run out of things to do…lol.

ttfn…sue

My Stitching bird.

OLYMPUS DIGITAL CAMERA

I usually set the next un-stitched canvas I want to stitch out on stretcher bars so I can look at it as I finish stitching the last one. This usually gives me incentive to finish a canvas and not dawdle; but sometimes (usually) I get ahead of myself and stick the new canvas audition out to soon and it frustrates me that the canvas I am working on is stitching so slowly.

This is one of those pieces that had many side stories to it, or maybe it is just insight into my crazy thinking. At any rate, I will try and explain as we go…I am going to walk you through MY processing. It takes some turns and twists…so let’s get started. This canvas is painted on three separate pieces of canvas for easy of handling; so I have three canvases framed up and I am going to start the bird’s bodies first.

2015-08-05 MS Bird tear sheetThis Melissa Shirley (http://melissashirleydesigns.com//) canvas is another guild member’s canvas (Remember if you like this canvas ask your shop to see if the canvas is still available.)  She loved birds and stitched many of them…I have a couple turkeys she stitched but this was one that spoke to me, so I brought it home. I knew I wanted all the squares to be the same stitch: middle blue square are Reversing Scotch, lightest blue squares are Milanese; and dark blue squares are Byzantine.  The yellow bars are Slanted Gobelin and the little squares would be Smyrna Crosses. I had even decided to stitch the bird in Brown Paper Packages’ Silk n Ivory (http://www.brownpaperpackages.com/).

(1st twist). Yes, I know some stitchers think Silk & Ivory pills on 18 count canvas and it may; but I have never had this problem. I think if you are stitching something that is going to get a lot of wear (belts, purses, etc.); Yes, then you should think about using another thread. But remember any thread on a wearable garment will wear: perle cotton will lose its luster as will silk pearls, floss will not hold up to constant wear, and wool will pill too. So in my opinion, you should use what you like. Wearable stitching is not for a lifetime in most cases. Using Silk and Ivory on 18 count ornaments, standups and other decorative pieces works for me and I use it. The only problem I have ever encountered over the years is that large area of Silk and Ivory stitched in Basketweave tend to be tight (but I did it on this piece as you will see), but I have very little or no problem with decorative stitches. I do us a size 22 needle when stitching with Silk and Ivory, I think the larger needle opens the wholes of the canvas a tad more and helps the thread move smoothly through the canvas.

So I had pulled my threads (I originally intended to do the entire bird in Silk and Ivory and had pulled all the threads. Good thing I have my stash at hand…because the best plans usually change.)

2015-08-05 MS Blue Bird square counts usedI don’t know why I picked a center square to start must have been Stitching Angel intervention, but somewhere I got it in my head these were not perfect squares. They are 16 threads to each square separated by 3 threads. But I made a mistake and stitched the Reversing Scotch Stitches over three threads instead of four. I could have taken it out but 2015-08-05 MS Blue Bird scotch squarefor whatever reason (I hate Frog stitching) I kept going.  I assumed the squares were off, but if I added a fourth thread to the dividers I could continue…I later went back and charted the Reversing Scotch and I liked my mistake better, so I kept it. After I played around and decided this mistake would work there was another twist: I have decided to change some of 2015-08-05 MS Bird rev scotch used 2the threads.

2nd twist: I have a list from Kreinik (http://www.kreinik.com/) of the threads they are no longer stocking (some you can request others have been discontinued) and I had spent a day separating these out so I would not use them for designing. I had lots of 042 Confetti fuchsia; I had used it to teach a class years ago when I was in certification for teaching. I use discontinued threads only in pieces for my personal use. So I decided to take yet another twist…

2015-08-05 MS Blue Bird copic marker3rd twist: A few years ago I discovered Copic pens (http://www.copiccolor.com and http://www.copiccolor.com/) and now I can’t get enough of them. While playing with the Copic pens and an air gun I realized I could color areas of white canvas to simulate any color canvas I could want to purchase…hummm…but that’s another story. But I have used them to color canvas backgrounds if I need a larger or different shaped background.  I wonder if I can change the color too?  So I stopped stitching and changed all the yellow to sorta pink so I could use the Kreinik Confetti Fuchsia.

So now I am back on track, well at least my track. I am stitching the blue squares and looking at the wings and sides too

2015-08-05 MS Blue Bird chin aAnother turn came (not really a twist but a stitchers/finishers decision) when I went to stitch under the beak. Since I have been doing some of my own finishing I am more aware of these sharp, small turns that do not finish well. So here, under the beak I made another stitchers choice. See that one stitch that is unpainted, it went away; not the finishing there will 2015-08-05 MS Blue Bird chin bbe easier. As you are stitching and you see this little opps, you can cover them with a stitch and finishing will be much easier

So for now I am stitching along on the blue bird bodies…I will be back with the sides and wings soon. .

Thank you for stopping by… I hope you find time to stitch today!  ttfn… sue

Good News: Tomato finishing and Royals win

14-10-01 1 clipsI think the size of the canvas was intimidating to me and I kept putting off the finishing but then I decided what the heck…it’s only needlepoint and it only took me six months of stitching time (the last six weeks were intense…to complete it). With my 2014-10-01 2 linetrusty canvas scissors I began to cut the tomato to within a 1/2 in of the stitching; then I turned and pined, clipping the curves and between the segments as I went. The instructions say wrong sides together but I am going to hand stitch mine using the ladder 2014-10-01 3 pin allstitch. Someone wrote me she stuffed hers as a frame weight and I thought this was a good idea so I’m going to go mine this way too.

Big Mistake: Tried to make one long cording using 3 skeins of floss, my arms are not that long, even with the help of two other people. But I got it done and have one long humongous green cord. Make smaller cords.

2014-10-01 4 weight battingStitched the bottom segments together and made a muslin bag for the aquarium gravel to make weight. Used quilt batting to place around the quilt batting and then used polyester stuffing to stuff firm and then stitched the top segments closed. I attached the cording and sewed it in place then finished leaves 2014-10-01 5 leaf liningand strawberry.  I lined the leaves with a ladybug material from my stash and used cording around them too. I also used a red cording to cover the seam and around the top of the strawberry. I attached the leaves using a doll needle 2014-10-01 6 strawberryand ribbon; I started at the bottom and pulled the ribbon through the tomato; I added one end of the strawberry cord and then stitched through the leaf canvases and used two of the buttons I painted on top of the leaves. Tied a

2014-10-01 6 finished topsquare knot then a bow, placed a dab of Fray Check to secure the knot and cut the ends.  And the frame weight tomato is completely finished and read for use.


Can you tell the difference in these two pictures?

2014-10-01 7 finished all2014-10-01 8 finished all

Yes, it is different sides of the tomato, but look at the strawberry. I can wind the strawberry up under the leaves and it will be shorter when I use as frame weight.

See me smiling and doing happy dance.

And BTW, I smiled and did a happy dance well past my bedtime yesterday. The Kansas City Royals won their playoff game last night! It was by far the best baseball game I have ever attended or watched!

Congratulations guys, if I were a wealthy woman I would buy tickets (better yet a suite…need 20 tickets) for my family and we would watch you win it all.

Go Royals!

Nice way to start the month and end the week (especially after previous post)… Good news is always best!

Thank you for stopping by, I hope you find time to stitch today! I’m going to design a baseball to stitch this week-end…ttfn…sue

All Rolled up…the Roll-ups are finished…Thank goodness

Finishing: Roll-ups

(each type of finishing has its own specific ins and outs. )

Bottom of roll-up will only have a beginning and ending open area, no hanger.

14-09-06 cord apply 01 begin bury end1. Pin the cording to needlework burying the beginning and ending knots.

On roll-ups, if I have a loop end I start with this end, otherwise I bury the knot. Sometimes if long cord 14-09-06 cord apply 02  pinhas been made you will only have the loop for one of your finishes. Just bury the knotted in a twist or two deeper and loop through the twist; this takes some practice but it can be just as effective.

14-09-06 cord apply 03 other half2. Pin around top. I pin cording from left to right but sew right to left (see #4 below)

3. If making the hanger; run cording through the loop or cording twist. (see #1 above).

Leave a hanger length on the top. Then go through the cording again and bury the knot.

NOTE — Top hanger: if hanger has been inserted in top (see blog: https://sudukc.wordpress.com/2014/08/26/hanger-in-the-top-piece/) just go through loop, knot twice( if extra cording is available), cut and bury the knot.

4. Using a waxed thread (sewing thread or a length of floss to match cording.) I sew with right side of needlework facing me; and I sew from right to left. I try to start right at the end where the two cords are buried and I catch the left end only and just tack it. When I come back around I secure the cording beginning and ending well (this is also where top loop hanger comes in.) This allows me some “fudge” room in case the cording is too loose or pulled to tight.

Remember to sew the opening(s) closed where the cording knots were inserted at the beginning and end. At these openings, I do not try to do a ladder stitch, but rather just slip stitch well. Ornaments do not take a lot of wear and tear so the cording just h14-09-06 cord apply 04 stitch through cordingas to be attached securely. I sometimes slip my needle back and re-stitch areas where the canvas has been left open and where the cording passes through itself and the knots are hidden.

14-09-06 cord apply 05 stitch through cordingGo through the cording, NOT over the cording. Going over the cording will make dimples in the cording (not pretty).

5. Tie off thread by running back and forth several times in the needlework. Cut close to finished needlework.

Enjoy

14-09-06 lewis roll upsAnd this brings an end to finishing the roll ups. I have six roll-ups waiting to be given as a gift and two for me.  The six are from a local needlework artist, Joan Lewis. She is no longer painting but I think she has some of her designs still left, if you are 14-09-06 betsy & TJinterested I will ask her. Thomas Jefferson and Betsy Ross are Ann Stradal ABS Designs and are available on her website (http://www.absdesignsonline.com/)  I’ve stitched  Thomas Jefferson twice but this is the first one I finished. I am a TJ fan from way back, I think Monticello is the prettiest Presidential House of them all and if I had owned it I would have had a hard time letting go of it.  I always 14-09-06 TJ tricornsaw him was a triangular shape, even though it is backwards of the true Tricornes  (https://sudukc.wordpress.com/2014/08/25/i-am-all-stuffed-out/) And Betsy I did put a hanger on but for no14-09-06 Betsy hangerw it a ribbon down her back and I just love her basket and the bullions on her hat and shawl…not that I loved doing the bullions…I just like the way they look.


General thoughts on finishing:

I will tell you this from experience, the more you finish the easier it gets and when you do several pieces of the same type (i.e. Roll-ups, ornaments, pillows, etc.) you get into an assembly line rhythm.

You may not like finishing; finishing is not for everyone but I think you should try one time just so you appreciate the work that goes into this art.  The finishers I know are really good at what they do and are fast considering that they do many pieces every week and then think of the season rush…Christmas, Halloween and Easter. It is pretty mind blowing to me; I would never make it as a finisher. If I make a boo-boo on my own needlework, it is one thing BUT if I made a boo-boo on someone else’s needlework I would be devastated. And I think you have a tendency to be much more particular when you are paying someone to finish than you are when you do it yourself. Finishing is a completion of your needlework. Whether you consciously think about it or not, you have a finished product in mind while you are stitching the needlework. And after you are done stitching you take or send your needlework to a shop to have it finished. Scary. Most shops do not let you talk to the finisher, so you better be able to convey your thoughts to the needlepoint shop person. Do you want simple or elaborate. Remember, unless you convey to the shop (who conveys this to the finisher) what you want…you may not get back what your mind sees as the finished product.

Patty Morrison was a local finisher and God called her home much too quickly for her family and friends. Patty always had a smile on her face and was one of those uplifting people you wanted to spend time with every day. I asked her one time how she did so many types of finishing. She told me she tried when possible to lump several together, ornaments, pillows, stockings etc. (the assembly line production) while keeping them in close date order to the way they arrived. She looked at every piece of needlework as if she had stitched it and was giving it to a special friend. She loved it when a needle worker would say on finishing instructions, “Do your magic, I would like a blue fabric” Or “do your magic.” She also said she thought of finishing as having her art shine through other people’s needlework; she was helping people complete their idea.

I have lots more to finish but it will be a few weeks before I have any more finishing but I promise to post when I do. I also have a desk full of work, many new ideas floating around in my head for the blog and needlework designs and of course enough stitching to keep me busy for a long time.

Thank you for stopping by, I hope you find time to stitch today! ttfn…sue

All twisted up…making cording

This post got long and so I am dividing it into two postings. First we will make the cording and then I will finish up. in a day or two.

Cordings

I spent the day making cording and applying to roll-ups. I used 4 strands of floss for all the cordings; black and white cordings are full skeins the others are measured cordings.

14-09-04 supplies allThese are the supplies I use to make my cordings: hand crank, electric crank (Dremel with a cup hook chuck), clamp and board with second hook and a fishing weight. I listed two cranks because I did make one cording with the hand crank, it took me about 1 minute to twist a 12 inch cord with hand crank; making the same length cord with my Dremel took about 5 seconds;  it was on/off almost. The Dremel makes life easier and my husband happy…he bought this at my insistence two years ago (I had finishing in mind back then too, just didn’t tell him.) and I just used it. I wish it had a reverse but oh well can use had drill for that.

14-09-04 cording sup hand crankHand cranks can be purchased from your local needlework shop or from Kreinik (http://www.kreinik.com/shops/Tools/).


14-09-04 cording sup electric crankDremel products can be found at your hardware store and craft shops. You can also use an electric hand drill and some electric drills have a reverse that will be helpful when making specialty cords.

14-09-04 hook & clampThe cup hooks are 1 inch size, one is for the drill and the other I attached to a small wood piece. I also have a third permanent hook in the sewing area so when I am there I can make long cords. The portable one is just handy but not as stable as the one in my sewing room. The clamp is also from the hardware store. I have a couple different types of clamps, but this one I like best for holding the wood piece. I have had to make it clear that my hardware items stay in the sewing area and DO NOT migrate to the workbench area…the Dremel may be moving soon from workbench to sewing area.

14-09-04 cording sup weightsI have no idea what size the fishing weight is but it is about 1 inch long. I add the smaller one when making thicker cords.

Note: want to have some fun? Next time husband is going to the hardware or sporting goods store, tag along. You’ll both be surprised at the things you will find that you can use in needlework at these stores. I have some scissors with a hook blade, great for frog stitching, I have scissors that squeeze, great for arthritic hands, weights, clamps, and yes I have even found threads in the fishing department…fly fishers use great threads and feathers.

Back to cording…I used floss to make all my cording. Floss comes in a wide range of colors and is inexpensive and it has a nice sheen when twisted. You can use any uncut thread you chose, just remember every thread has a yardage. If you are going to make cording with threads that have dye lot issues, buy the thread for cording at the same time you buy the threads for stitching. This will mean you need to have an idea how you plan on finishing the project (ornament, stand up, pillow, etc…) The needlework shop should be able to help you with how many skeins/cards/reels you will need, every thread had a yardage.

Okay let’s make floss cording… One person can make a skein of floss into cording; just take it slow and as you practice it will get easier.

BTW: If you do not want to invest in either hand or electric crank tool; find a friend and two (un-sharpened pencils, chop sticks, dowel, etc) to insert in the strands to make twisting easier. Follow the directions below with each of you twisting clockwise.

Skein of Floss = about 30-32 inches of twisted cording

1. Pull skein of floss completely out.

2. Fold in half and then fold in half again; you should now have four equal strands of floss.

14-09-04 cording 4 strands and knot3. Knot the end with cut ends.

4. Place folded ends on stationary cup hook and knotted end on crank hook. I prefer to have the knotted end where I can see it, although this is not always possible; just make sure knot is not going to pull out as you twist.

5. Stand away from stationary hook so threads are snug but not tight between the stationary hook and the crank hook.

6. Twist…some say to count the twists. I have never found this very successful (I must be counting challenged.) I find that experimentation works best. And you will notice as you are twisting, the threads will start to pull toward the stationary hook. Keep twisting and keep threads taut but not pulled tight.

14-09-04 cording  test twistYou can also check the twist by grabbing the cord about four inched from the crank hook; keeping rest of cording taut, let the crank hook turn back on itself to see about how the twisted cord will look. This experiment can easily be pulled out and continue to twist until desire results are reached. Practice will make easier, and like riding a bike you will not forget from one finishing project to another.

14-09-04 cording ends together weight onOnce the desired twist has been reached place a weight near the center of the twisted cord and bring the drill toward stationary hook, keeping strands taut and separated. Once the ends are close together, secure so the ends will not move, pull the weight to center and begin “to walk” 14-09-04 cording weight walking athe cording. “To walk” cording; grab both twisted strands about six inches from weight, keeping remaining strands taut and separated, release the weight and allow strands to twist. Repeat this six inch release method up the strand toward the hooks. Once the hook ends are reached, carefully remove threads from hooks keeping a firm hold on these ends and place an overhand knot in this end and allow strands to continue spinning if 14-09-04 cording walking bnecessary. If cording had little bumps you can usually rub these out between your fingers by rubbing the cording toward the folded end.

Cording is completed.


To make a specific length of cording:

1. Measure around the finished needlework to find desire length of cording ( If making ornaments to not forget to add 3-6 inches for 1 1/2 – 3 hangers)

Ornament Example: 12 inches around + 6 inches for 3 inch hanger = 15 inches

I add 2-4 inches depending on project for safety factor ( I have made cording that comes up short) So 15 inches + 3 inches = 18 inches

18 inches x 3 (This is the standard not sure why used but I use it) = 54 inches

You will need 54 inch lengths of thread to make 18 inches of cording.

2. If you are using floss make two 54 inch lengths of floss, fold in half (you should have 4 strands of floss. Follow directions above from #3. When completed you should have a length of cording about 18-20 inches long. Enough to complete your ornament and if you have leftovers save for your notebook with notes.

After you have mastered simple cording with floss…

Try using two different threads (any uncut thread can be tried) in the cording I would experiment (good place to use hand crank…you will be able to observe the elasticity of the chosen threads, how they twist, if adjustments will need to be made when making cording for project) with the same type of threads leftover from another project to test how many strands you will need and how the two threads will twist together.  These threads do not have to be color coordinated, this is a practice piece. Keep the sample and notes on Number of strands, length of thread before twisting and length of cord made.

Example: Two strands 12 inch Very Velvet and two strands 12 inch Flair threads.  How do they twist? Does one twist faster than the other? Will you need to make one thread longer than another to compensate for the twisting? Only these questions can be answered by experimenting.

Making cording is an individual thing. Some like their cording very tight other not so tight. Practice and take notes.

A word about knots in cording:

Knots are never good in needlework; knots can show up and be unsightly and finishing is no exception. Sometimes you can bury them with no problem but if finishing a flat item you may want to consider binding the ends of the cording with a Hangman’s knot. Hangman’s knots are 14-09-04 cording end loopconstructed by making a loop of thread and laying it on the strands of cording. Begin to wrap back around the threads of the cording and the loop (leaving the open cut end open.)

14-09-04 cording end wrap

Wrap about 1/4-1/2 inch (depends on size of cording); slipping thread through the loop.


14-09-04 cording end pullThen pulling the end of the loop to draw all threads under the wrap.


14-09-04 cording end 2 ends cuttingYou will also need to do two of these and cut between when you have made cording for more than one project.


These knots are smaller than overhand knots and work better especially on flat ornaments. I have also been known to drop a drop of Fray check or glue on this area for extra security….just depends on how much of a purist you are.

In the next couple days I will post the finished needlework…

Thank you for stopping by, I hope you find time to stitch today! ttfn…sue