
Materials used:
Stitched and blocked needlepoint pieces
2 Copies of each stitched, blocked pieces
Backing fabric: I used two
Ultra-suede for the wings
Cotton for the rest: fat quarter would be ample
Batting: low loft for wings and body
Batting: craft weight for sides and body
Fiber Fill
Sewing thread to match fabric
Illustration board
Paper scissors
Glue
Cording
Usual sewing supplies
 I have contemplated how to finish this piece for weeks/months. I should have listened to that little voice in my head that said, “Send it to the finisher.” But no I just kept looking at it and I had a friend who had stitched one (she sent hers to the finisher) and I figured I could manage this myself. Afterall it was just a stand up without the stuffing… and ornament in 3-D…I can do this.
I had it on the blocking boards for a long time while I mulled over finishing in my mind. Then I got brave and began the process. I mad two copies of each of the blocked pieces. And then I plunged in…I felt like a kid jumping off the high dive for the first time. Once you get up your courage to climb that ladder you gotta go off the diving board; if you climb down…well you all know what that means when you’re a kid. So off I plunged…
Once I took the plunge it was a long way down to the finish; this project took me at least two weeks to complete. I would breeze right along and then I would hit a rough patch and it would take me a couple days to get through it. I’ll let you know as we go along where, when and why I became frustrated.
 I had blocked the pieces. Even though I had stitched the designs on Evertite stretcher bars I still block. I do know some people who adjust and tightened their Evertites and block using them too but I do not. I use my Marie’s blocking board (if any one has one they don’t want, I will pay to have it shipped to me.)
 I also made two copies of the pieces on the printer/copier for patterns. Remember copies of copies are a bit smaller, I think the standard is about 97-98% smaller; so when you make a copy of your stitching it is already a bit smaller. And sometimes I use more than one copy and so I have a second in reserve in case I need it. It is hard to make a second copy once you have started or cut the first copy.
 I started finishing the wings, they were easy; they were like a soft ornament.(see: https://sudukc.wordpress.com/2016/03/23/finishing-ornaments-3-soft-ornaments/) I cut out one of the copies for a pattern of each wing. I colored the edges with my Copic pens (https://imaginationinternationalinc.com/copic/), I don’t like grin through.
I trimmed the canvas to within a 1/2 inch of stitching and clipped the curves. I finger pressed to the back  and used Clover clips to hold in place. These clips come in several sizes, I like the green jumbos best (http://www.joann.com/clover-12pcs-jumbo-wonder-clips-neon-green/14789036.html). I buy them at JoAnns with my $$ off coupons.
 I stitch the canvas to the back with a double waxed sewing thread. Always wax your thread…it makes it stronger and it keeps it from twisting and knotting.
I used a small piece of ultra-suede  I had to back the wings; I used each stitched wing to cut a backing fabric. I marked the stitched needlepoint onto the wrong side of the fabric and clipped the curves. I cut two pieces of low-loft quilt batting using the patterns I made for the wings. I used one of the quilt battings to stabilize the backing
  fabric and to give me something to fold the ultra-suede back onto and it also gave me something to baste the fabric in place.
 Then I sandwiched all together: needlepoint second batting and backing and pinned together. I stitched the wings. I also decided that there was not enough dimension to the
  wings so I stuffed them with fiber-fill. I didn’t think I filled them too much but they proved to be a problem later on.
I also made a smal l cording, joined and stitched it around the wings…The wings were completed and truthfully I think this took me a couple days, but they were no problem.
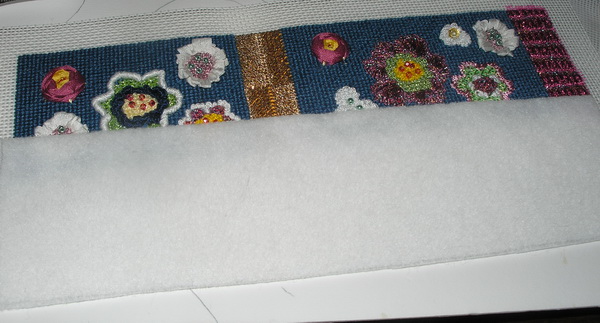 Next I finished the side straight pieces; one short and one long…these had the decorative flowers stitched on them. I used pretty much the same method I had used finishing the wings without the fiber-fill.
Using the patterns I cut batting for large and small side pieces. I cut the needlepoint to within 1/2 inch of stitching.
I finger pressed the edges to the back mitering the corners around the craft weight quilt batting, pinning in place.
 Using a double waxed length of sewing thread I laced the sides together, starting in the middle and working toward ends and stitching the mitered corners.
 Then I cut backing fabric 1/2 inch larger that the needlepoint. I finger pressed and pined to be just slightly smaller than the finished needlepoint. I pressed this in place with my new gadget I purchased some time ago to help with finishing. It’s a Clover Mini Iron with all sorts or attachments. It has a large
  and small iron head, a ball head
  (I think for curves, a long thin head (probably for corners and a cutting knife. And I doubt I will ever use the cutting knife since I do not want to gunk up the iron for finishing.
The reason that I stitched these slightly smaller than the needlepoint is because when I assemble the pieces together I am going to join them together through the needlepoint and therefore the lining needed to be slightly smaller because it will be inside the bird.
 I stitched the backing to the needlepoint using a single waxed thread. These pieces went quickly and I thought I was on a roll; then finish came to an abrupt halt.
The bird body gave me some trouble and so if you don’t mind I am going to continue this saga next week., otherwise this post will be way toooooo long. I can give you a hint…I did finish this bird but it took me the better part of a week, a few well-chosen words and a do over. But for now…
Thank you for stopping by, I hope you have time to stitch today!
ttfn…sue
