This post can give a whole new meaning to snow and bunny used in the same text. Today I am hunkering down in a blanket, hot chocolate and my stitching and hoping the power says on. We are expecting a blizzard that started at 5:00AM this morning and is supposed to continue until tomorrow morning. The forecast is calling for 12 inches at my house and 35 mile an hour winds and bone chilling cold.
 This was my patio about 7:30Am this morning
And this was the patio at lunch time. 
We had about 4-6 inches by noon and it is not letting up. I am not complaining because just a few miles to the east of me they are getting the brunt of this storm and are suppose to have 24-30 inches
 The bunny reminds me of spring and so I will just continue my stitching, watch the news and drink my hot chocolate.
I am doing a Turkey Work stitch using Appleton wool for the bunny tail. I am not going to cut these loops, so I want them all uniform in size and used a toy (think it is an old Tinker Toy) to keep the loops uniform in size. I stitch a row at a time around the toy and then remove.  If you look at the picture I have diagramed the stitch to show how I do it. It is different than most books show it. Any of us in the Midwest that do this method refer to it as the Joan Lewis method of Turkey Work as Joan is the one who taught us this method. She claimed she found it in a needlepoint book but I have yet to find it and I do own a couple booksJ.
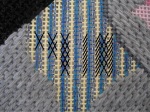
 The jacket will be a combination of the VanDyke stitch stitched with blue #3 DMC perle cotton and an Encroaching Gobelin stitched with gold #3 DMC perle cotton.
After this I will start the flowers and carrots…if this snow continues and I have power I may post again later in the week.
I hope everyone in the path of this storm is staying warm and safe. And I hope all those of you who stitch stay warm, safe and stitch! ttfn…sue


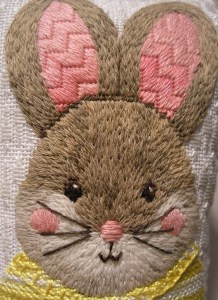
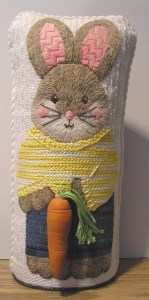
 Easter time has lots of Random Stitched pieces. Bunny in yellow sweater was not meant to be a realistic interpretation of a bunny, but I stitched his fur like I thought a real bunny would look. On the face you can see all the stitches radiate from his nose. The ears are separated by a row of tent and are stitched to the contour of the shape. His paws were stitched in separate areas; each paw looked like I was three separate sections.
  Another whimsy bunny is the bunny in a carrot. His ears were Random Stitches and the thread, Peluche helped accent this stitch. In fact really long stitches could be used here since the thread had such great texture.
 with it seemed to like it. One day Peter and Epic threads came together in my head and so this Grandmother bought Peter and stitched him. The only threads from the original kit were the threads used in his eye, nose and mouth. His fur is 5 Epic threads, blended together. He is my favorite stitched bunny and probably one of the best Random Stitches I have stitched so far.


 The Tailor of Glostershire on my stitching bags is also Random Stitch. Again I probably used 6-8 different Epic threads.
 The Eagle I did for my Grandson he achieved the rank of Eagle Scout in the Boy Scouts of America. The original canvas I bought on Ebay; I contacted the designer and was told the canvas was no longer painted and would not paint the multiples I requested! I wish I had kept the original canvas, but that’s another blog too. Anyway, I used Caron Impressions for the white feathers on the eagle. I love the way he looks and if you notice where the white feathers meet the black body and wing…I stitched the white up to about an inch from the bottom, then I stitched the black areas, and then went back and stitched the rest of the white feathers.

 And really the hair on the back of this angel from ABS Designs (
 I am showing you the back side too…I know this is not something we do very often but I want you to see that I am not methodical about where the Random Stitches are placed.

 Before I ever stitch, I Goggle pictures of animals if I am not familiar with the animal to see how nature makes this animal’s fur/feathers grow (I did this for the eagle, Leopold, (more about these later) and I had the original picture I used to have Lucy painted). I look at the canvas and get an idea of how I want the fur to I look and visualize the stitched piece. I visualize how I think the areas move or change and I begin to divide the areas into sections. You could make a copy of the canvas and draw lines on the copy to help if you are not a visual person. I look for starting points in the pictures; ( See the top drawing at left: everything somwhat radiates from
  the red dot but the red T are some of the parts in the fur…just like the parts in our hair.) Then find the best starting point on my canvas. Sometimes there is more than one starting point and sometimes it is not a point but a line or area. There is no one correct way…ever had a bad hair day?! (second drawing are suggsted stitching lines ) Then Unlike the diagram I am showing, I work in small sections. I will randomly pick an area and stitch the first line of fur (for our discussion the purple stitches shown on the diagram) then I will stitch the blue stitches. I fill in this area or sometimes will do several of these divisions (see Lucy picture yesterday);
  then I fill in these areas. I save the single overstitches until large areas are completed; then you can see the areas that need a different color or need to be lighter / darker.I try to make all the stitches work as I am stitching but I have done my fair share “Frog Stitching.” I have even taken complete areas out, but like any technique, the more you use it the better you get. But the beauty of Random Stitching is that if you have the general direction of the fur correct, you can add subsequent layers of additional color to help make the fur realistic.
 #1: I use a Chenille needle (I use a Chenille needle for much of my stitching, but this is another day’s blog). Chenille needles are sharp and will pierce not only the threads but the canvas as well. #2: And I stitch from the lower to the upper (clean hole to filled area.) I do this so I can change the direction of the line and still connect to previous stitches. Notice I did not say filled hole, you may not be using a filled hole…I have even been known to pierce the canvas threads if need be. I usually use a minimum of two strands/plies of thread when I am stitching the base layer and I try to split these strands/ plies as I stitch. The base of my Random Stitching is done the way diagramed but then the stitches on top are randomly stitched and can come up anywhere and go down anywhere.
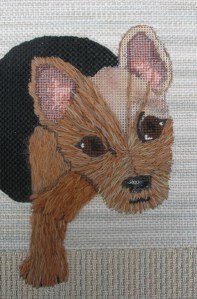
 Friday I was looking for something in my den and found “Lucy.” I had not forgotten about her…hard to do since she is at my feet all the time…but her needlepoint had just gotten put aside …out of site out of mind. All that was left to stitch was Lucy’s fur…so this weekend I stitched lots of Lucy.
 One of the best books in my library about creative free stitching is Robert Cates’ book: Creative Needlepoint. I bought this book many years ago at an ANG Bookstore but I have seen it on Amazon at different times. I loved the way he stitched his designs freely and experimented with threads, textures and stitches. He bent the rules and colored outside the lines!