I think I will keep taking the trip down memory lane by shop or type of technique (sorta off), so I will try and not forget anything. Second stop Florilegium…
If there is one place to go to get your creativity going this is it; the most wonderfully creative place in the Midwest! So if you are anywhere near Kansas City and St Joseph, make Weston, MO a sure stop on your itinerary. I would allow minimum half a day because after you step into the creative world of Florilegium (http://florilegium.com/) you may only come up for air when your stomach growls for food (great places to eat in Weston, Mo. too.)

Gretchen (pictured on left) is the artist and owner and she is another person I would just like to follow around and watch the creativeness dripping off of her. If only I could carry a basket and put some of her creativity into a basket and bring it home.
Cathy (pictured on right) is the store manager and is soooooo sweet, just talking to her can lift you up. She claims she’s not that creative but I’ve seen pictures of her house and yard. I think she is creative. And her munchies are very creative….I’ve eaten my fair share.
I never go in here that I don’t feel so inspired, it is eye candy for the creative. And I always want more.
AND this is one of the places I have been learning new things; I like to think of it as expanding my creativity, that sounds so much better than increasing my stash.
 But in order to catch up quickly I am just going to list what we (there is always a group of us headed that way) learned in no particular order. We make a day of it; leave KC after rush hour, arrive about 10AM, stop for lunch (great bar-be que place (Tin Cup) in Weston) or Gretchen has a lite lunch if we are having afternoon class. If we don’t have afternoon class we shop and head home before evening rush hour starts. I love my days spent in Florilegium; whether you learn a new needleart or you just go for the eye candy, you are never disappointed.
Our first class was a beaded tassel. I forgot to take a picture but imagine place mats with everything laid out like we were having a meal. I was awe struck, I was also a bit dismayed because there were these two very fine knitting needles laying there and I knew that most of us did not know how to knit…
Sure enough Gretchen wanted us all to knit an “I” cord so long…we all looked like deer in head lights…knit? No, we are needlepointers. Gretchen never missed a beat…she told us to pick up our wooden bead, and thread our tapestry needle with our silk ribbon. She explained how to start covering the wooden ball with the ribbon. And while we were all engrossed in doing this, Gretchen slipped out of the teaching area, grabbed a different tassel and was back before our wooden ball was barely covered. I’m not sure anyone else noticed she had left the area, but since I was a needlework teacher, I was watching her to see how she adjusted to our bump in the road. Trust me, it did not faze her and I was in more awe of her. Not only is she soooooo very creative, she is calm as a cucumber.

We spent the morning making a tassel. Just before class was over Gretchen slipped out again and came back with a basket of yarn and needles. She placed it in the middle of the table and told us all we were going to have our first knitting lesson. And we did. Everyone tried to cast on several stitches and then she had us all knit. We knitted both directions. She suggested we go home get some size 8-10 knitting needles and a skein of sports yarn and knit the skein. When we were finished with that skein to get another and just purl the skein. And when we were ready to start a project , just come back and she would help us.
We all left that day with more than our tassels, but then that’s a given when we go to Florilegium. You can order the tassel on her webpage or just drop by and sit a spell and Gretchen will be happy to start you on your creative adventure with her. We also had picked out our next adventure…beading.
ED Note: A group of us get together a couple times and either finished our tassel or made another. And I have a bookmark that we need to do sometime this year. We usually get together again for most of our projects or just to stitch on our favorite things.
Beading was our next adventures…there were two adventures…
 We made a beautiful Rose necklace; the technique is bead-weaving. The highest rose was supposed to hold the gold ring in place around your neck, but mine kept slipping. So I improvised and added another leaf to wrap around the gold ring; this worked sometimes but not always. So I decided to take the top rose off and to reattach above the brass ring. The third time is working; the necklace still goes over my head but the rose above the ring keeps the ring from sliding up. This was my first attempt at beading and so I may someday re-bead because I think with wear the beading thread will stretch…I’m not sure I stretched my beading thread before I used it.


 Our next venture was Herringbone stitch. It was adapted from the book

Bead Play by Beth Stone. This was a fun little venture into a new stitch and also different beads. I really got into this and you will see my little piece again down the road. The hardest part was the diamond, but the instructions are in the book and by the time I got to it I had taken a Peyote class and was familiar with that technique too.
And yet more adventures were awaiting us at Florilegium: two types of needle-felt we learned.

Victoria Hart Ingalls (http://www.victoriahartingalls.com/) taught us Proddy Flower needle-felt and later some took Victorian Heart Fine needlefelt (http://florilegium.com/florilegium-events/). Victoria has been doing this a long time I have a bunny I purchased from her when I thought I might want to take up needlefelt. I went to a yearly gathering they have in town, but it was overwhelming to me at the time and I decided needlepoint was best for me at the time. I loved the Proddy Flower and finished mine and used some of the techniques later to make Christmas ornaments.
Our next needle-felt endeavor was needle-felting; we made a needle-felted 3D sculptures taught by Kate Barsotti, a really creative person. You can Google her and also see some of her things on Pintress or at Florilegium (http://florilegium.com/whats/kate-barsotti-needle-felted-creatures/).
 My first meeting with Kate was at a Fiber Guild meeting where she presented an introduction to needle-felting and a mini needle-felting class. I though at this class she was so cleaver in the way she presented things. She had a huge box (10 inches long—industrial size) of Band-Aids and told us the needles are sharp and to be careful but if we needed any her Band-Aids were handy. The other thing about her classes is that she does not have a specific 3D project for you to make. She just starts you off making a core of needle-felt and when you ask what you are making; her answer is, “The felt will speak to you.” Mine was a baby Eagle.
 At Florilegium Kate taught (http://florilegium.com/inspiration/beginning-needle-felting-kate-barsotti-nov-2016/) and we got to spend more time and learned about the different needles and felts and to see some of Kates work. This time my felt spoke up and said “I wanted to be a penguin”. And so a penguin was born.

Since my first steps into needle-felting I have acquired a stash and have made a few ornaments and animals but this is another posting…
We have never taken knitting classes at Florilegium but we have added to our stash and I really want to experiment with freeform crochet and knitting:
http://florilegium.com/one-small-thing-among-many/
http://florilegium.com/one-small-thing-returns/)
As the weather is getting more spring like I see a trip in my future…a day in Creative land.
Next time a trip to the bead shop…but for now I have not given up needlepoint, so I am off to stitch although I should practice knitting too…no I am going to needlepoint today.
Thank you for stopping by, I hope you have time to stitch today.
ttfn…sue


 and if stitching has been done, a picture of that too. Pictures needed also of a stitch guide, if available and an optional one of the materials list. The materials list is a must if threads are included and then you get to lay all the threads out, check against materials list and make notes of missing or substitutions, and of course a picture of the threads.
 It is summer and I run around a lot, so if I miss a week or so I am sorry but I will try to do better than I did last year and not show up for months on end…But we all know how I over extend myself. But I love what I am doing and summer is such a fun time to get out and about. And I have great friends who keep me moving and learning new things , as well as enhancing my stash and “2-it” projects. I am stitching at least twice a week with friends and going to beading once a week, not to mention the “2-do” on my desk and the “want 2-do” in my stash. Plus I am still trying to conquer knitting and am crocheting a shawl as my fingers type, not to mention the beading I have in another bag….
 …and then there is the new phone I got last week that I need to learn more about. My last phone I never did learn what all it would do and now this new one is 5 versions later…I have vowed to learn more about this phone than my last one. You’d think by now this phone could call me by name and tell me everything I need to know….and keep me on track and out of trouble…


 You need bobbins to roll your looooong lengths of yarn on (save bath tissue cardboards…they make good bobbins for large yearns and large amounts of yarn). So we have bobbins

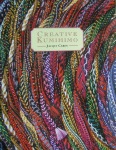 Creative Kumihimo by Jacqui Carey,

 probably never be a more than dabbler in this technique, I knew I was hooked when I had a lunch box and bag for my supplies. In my lunch box I keep a pair of working scissors, a tape measure, weights, the different disks I have and my current project. In my bag are different sized bobbins, some sample braids I have made to see patterns and the yarn for these sample braids.
 This is the one I finally made for gift I made last year. It is just #5 perle cotton.


