More on thread organization

Organizing threads is an on-going project…

My SplendoOLYMPUS DIGITAL CAMERAr, Watercolors, and DMC flosses and perles are sorted by number, the rest are mostly by color and then by number. If I found a chart for color families, I have a copy with the threads.  Splendor, Silk & Ivory, Vineyard silks (these are the ones that come to mind) also have color family lists that I think you can find on line at their websites…I keep a copy of these also with the thread.

I also have color cards for many of my threads and these are stored hanging, in my old wooden toy bucket, or in a notebook (these are all my Rainbow Gallery threads).  I need to update these too.


Let me add a note here…I use and store my threads UNCUT, since I do some of my own finishing… I want to be able to pull the threads to use when making twists. I do not cut my Watercolours either but that is a post for another day. ThreadworX (http://threadworx.com/) is one of the few threads I have that are cut; the other two that come to mind are Dimin Epic and Rosebud Studio Felicity’s Garden and that is because they have such great animal fur colors. Epic and Felicity’s Garden are stored by color.

Back to storage…Some of the threads are stored on rings in sweater boxes; these are mostly stored by color, then number on large rings; the exception to this is ThreadworX and they are stored by number.

Another added note: I use the Floss Keys; I got mine from YarnTree (http://yarntree.com/) and Floss Pak bags to store yarns that I have begun to use on these rings.  If the skein or put-up  hasn’t been opened it hangs on the ring as is, but once I go to use it I wind it on a card.: I try to buy threads I know that have changes in their dye lots in pairs, so I will have two skeins of most colors. Once I wind one of these skeins on a floss Key I will store both in a Floss Pak bag. Once one of the skeins is completely or almost completely used I will buy two more hang them on the ring next to floss bag.

I also use the storage boxes I get at Hobby Lobby with my coupons; each box is labeled to the contents. Kreinik, DMC, Trebizond, Kreinik silks, Painter’s threads. Some others that I have limited colors are stored in these boxes too one for cool colors V-B-G and one for warm colors Y-O-R. These threads are stored by company , then by color, then by number;  I usually have less than two dozen of these threads per company…otherwise they would rate a box.  I always keep the label with the thread!  I make a template to store in the lid with number info for all these boxes.

All the DMC floss, #3 and #5 perle are stored in Hobby Lobby boxes. I use floss keys to wind the threads; each is specifically marked and is stored with the labels as well (I wind the thread over the labels.) The Floss Keys are marked not only with the color number on the top right but the type of thread on the top left: i.e. DMC (floss), DMC#3 or DMC#5.


I have some threads hanging on a wall but the sun does not hit them and they are mostly threads I have made samples of myself and some are discontinued or threads I do not use. I would not store threads here I plan to stitch with, there is too much of a chance they would fade or get dusty.


When I started this re-organization, I decided I also needed to update my inventory sheets. I have kept (and I use this term very loosely) a spread sheet of the different threads in my stash for years. I am not very good at remembering to update these files and so as I started the physical re-organization of my threads, I also took the time to update and re list threads in the spread sheets. DMC was the file I had semi kept the best and it was fairly easy to update. Some of the other threads I had listed all their colors even though I only had a partial inventory; so I made a second sheet within the spread sheet for the thread and called it “my threads” and the complete list is “master.” I moved the color info for only the threads I have in inventory to the “my threads” sheet. Now when I go to use threads I will be able to see if I need to fill in families (if info was available).

It took me a while to set up but it keeps me on track. I have been a poor record keeper and so I have some threads that I have kept buying because I was not sure I had them. I have 7 cards of #820 red Splendor; since this is a Christmas red I think several of these are probably from classes I have taken but I probably bought several too. I am from the school when in doubt, buy two. I have a few others of these and I did notice they are all in my comfort palette so I know I have purchased them more than once.

I have promised myself now that I am pretty thread organized both in storage and on paper I am going to keep it up. Will let you know at the end of the year how I feel I did. I have also bought a small loose leaf notebook (5.5×8.5″) that I am going to adapt the spreadsheets to fit, so when I am shopping I have it with me. Probably won’t work as well as I envision but we’ll see.

Storage and record keeping of threads is an ongoing thing and a personal thing. I think you have to look and listen to how others do theirs and then incorporate what works for you. AND then you have to be diligent about using your method.  I have a friend who gives or throws her threads away after every class or piece she stitches…she says it is more trouble and aggravation to remember where the threads are, to get them, and she never has all the right ones. There is too much Scotch blood in me for that…

Now that I have my threads in 85% order…it’s never completely finished, I am starting on all the stitch diagrams and stitch patterns I have collected and want to put in my computer. I know there are a great many stitch books out there and this is just for my benefit, don’t plan on writing a stitch book. But I have lots of stitches I have written down that I think could be developed into quick little designs.

Thank you for stopping by… I hope you find time to stitch today

ttfn…sue

Needed to reorganize


OLYMPUS DIGITAL CAMERA

My office and threads got away from me last year and even though I DO NOT make New Year’s resolutions, I decided reorganization was needed. I spent some time thinking about how I wanted to do this and nothing jumped out at me, so I decided to just jump in and start.

I made some basic decisions: If a thread is discontinued, I was getting rid of them: Good-bye Marlitt; Rainbow Gallery has discontinued threads over the years and I still have them, good-bye discontinued threads.  I had a complete set of JP Coats and I don’t think they make it anymore and if they do, I never used it.  There are two exceptions to this rule: Orange Needle Necessities (now ThreadworX) Overdyed Rachel. ThreadworX does not produce this thread and I love it for carrots and carrot noses so I horded several skeins for my own personal use. And another Needle Necessities thread, an overdyed Madras in blues was perfect for my Peter Rabbit coats; so I horded it too. I have been to the ThreadworX website (http://threadworx.com/) and have noted a few choices to replace these threads. ThreadworX if you are reading this: would love a #5 perle cotton in Trick or Treat orange.

I also decided that if any of my DMC floss or perle cotton was cut I would get rid of it. If I use perle cotton for stitching a Temari ball, it cannot be precut because I use very long lengths when stitching Temari Balls. I did keep my Anchor perle cotton, although I have heard it had been discontinued (Anyone know anything about this?). And I do know that Colonial Needle (http://colonialneedle.com/) carries a full line of Finca floss and perle cotton thread (sizes: 3-5-8-12-16) in a great color range, so I’ll start adding that to my stash. 😉

My old threads are going to a friend who uses odds and end of threads and canvas to stitch hearts for a Hospice Home near her. A heart is placed on a patient’s door after they have passed away. This alerts staff and visitors to be respectful and quiet around this patient’s room. The family is then given the heart when they leave. If there are any threads she doesn’t want she will send them to a prison in Ohio that used them.

So I began. Then I had to decide if after I separated all the threads I was going to sort by number or color. I finally decided on using both and seeing if I prefer one method over the other. All the DMC is stored by number and I will continue to do this since I have a great color card. If I stored a thread by color then within that color I stores in numeric order. Watercolours overdyes I stored by number but others I stored by alpha name. I guess you just have to find a method that works best for YOU.

I also decided to wrap all my threads on large floss winder cards and so I ordered 1000 floss Keys and 200 Floss Pak bags from YarnTree (http://yarntree.com/) so I can start this process. I also purchased some storage containers from Hobby Lobby to store the floss keys. I have begun a slow wrapping process…as I need a new thread I will wrap it on large floss winder cards. I also use these floss winders for any thread that is skeined, even overdyes. This will be an ongoing process; otherwise I will not get anything else accomplished this year.
I finished my reorganization this week-end by labeling all the containers. I feel so accomplished. I have two boxes and a bag for my friend who stitches hearts. I got rid of 4 large sweater boxes from my closet and I still have a closet full of threads! And of course, we all know that when I go to stitch, I will not have all the right threads….Stitcher’s Law. 😉

I don’t know if this is the final reorganization or whether I’ll redo as I go, but it is sure a lot better than it was last year. And I am still looking for an answer to whether Anchor is doing away with their pearl cotton? I would love to hear from you on how you store your threads. Do you store by color by manufacturer, a combination? I think when we share , we learn and that’s what this is all about and having fun stitching of course.

Thank you for stopping by… I hope you find time to stitch today

ttfn…sue

P.S. Someone asked me this week what “ttfn” means.  So for those of you who don’t know it is from Winnie the Pooh; Tigger says it all the time. It means “ta-ta for now” or “ttfn”. Winnie the Pooh books were my favorite growing up and my grandmother used to say this to me. So if Carol Burnett can pull her earlobe for her grandmother, I can ttfn for mine. It just makes me smile and we need to smile and make the world a nicer place.

Thank you Stitch Guide writers

I just spent the most relaxing week. I was house sitting my niece’s dogs….it’s a tough job but someone has to do it and I’m so glad it’s me.

This is my view and if I’m lucky a deer or two will stop by to see me…

15-03-24 deer

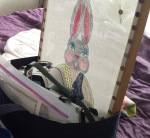
15-03-24 bunny unstitchedUsually I take a have computer project to finish, but this time I took nothing but a painted canvas, threads and a stitch guide.

But that I want to thank all those people out there who take the time to figure out stitches for painted canvases. It is so relaxing (like stitching a piece of basketweave). All you have to do is pick up the thread, look at the diagram and stitch. I’m not saying that if Sally Stitchguider has suggested Bulllion Stitches using  Marlitt thread (so glad this thread is gone) for hair that you  must follow her suggestion…I personally think Sally Stitchguider was having a bad day and I would use loose French Knots with floss first.

BUT for the most part these fine people have a working knowledge of what they are doing and are usually right on the money.  They keep abreast of all the new and exciting threads on the market and try to incorporate them in their guides.  They know what stitch works best with what thread and they don’t have to experiment around.

Keep in mind there are several types of stitch guides. And not all stitch guides are created equal. Some stitch guides are written for a canvas and the shop that sells it. This means that all the Blue Dog canvases that Shoppe Around the Corner sells will have the same stitch guide for Blue Dog. The stitch guide writer knows the threads that Shoppe Around the Corner stocks and will use them in the stitch guide.

Some designers pay stitch guide writers to write stitch guides for their canvases. Some will sell these at an additional cost to the canvas, some other designers will include them in the price of the canvas.  This means that Debby Designer’s  Pink Cat canvas will have the same stitch guide no matter where you purchase the canvas.

And then there are the canvasses that you ask to have a stitch guide written for you. Depending on what you expect you can plan on paying from $0 to $600 (highest I have heard so far). Some shops will give you free thread and stitch selections if you have purchased your canvas at their shop, but don’t expect a big written out booklet…remember you get what you pay for.  Keep in mind, you are asking someone to spend time writing a guide for you and so if you do get a booklet complete with threads and stitches, Sally Stitchguider  has a business too.

My stitch guide came with the painted canvas and threads (the threads were extra but could be purchased as a kit too. )  I seldom stitch a painted canvas with a stitch guide and threads already chosen for me, but I picked this up at a guild sale and decided to stitch it. I usually like the challenge of choosing my own stitches and threads and usually make it up as I go. I approached it like a class project and so I first read the stitch guide and checked the threads to make sure I had what I needed. There were a couple thread substitutions (but that happens), so I made the notation in the instructions and then I started stitching.

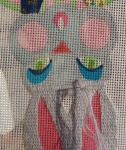
15-03-24 bunny headI started with area #1 and picked the thread out of my thread packet and began stitching. The guide suggested Encroaching Gobelin over 2 threads and I tried it but didn’t like the look. I thought the bunny to large for such a small stitch so I “frog” stitched the area. But in keeping with the stitch guide my adjustment was an Encroaching Gobelin over 4 and encroached 2 threads.

15-03-24 bunny stichedThis was so relaxing and then I realized was not looking at other areas of the canvas to decide what stitch I might want to place in various areas. It was so mind relaxing. As I was stitching the mouth area in basketweave I realized that if I stitched the tooth n basketweave also it would recede into his mouth to far to please me so another stitcher’s  choice to wait and use straight stitches for the tooth and I stitched the tooth area twice to make it padded. I also have decided his cheeks need to stand up some and so instead of basketweave here too I will make padded satin stitches…I did the same with his nose.

I started stitching his ears in a  4 by 6 Byzantine…not sure where it came from but it was not the Diagonal Mosaic that was suggested.

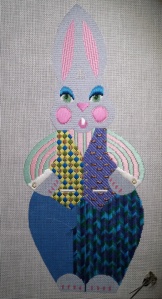
I realized without thinking I was stitching without checking the stitch guide and so I got back on track with his vest.  Even though the canvas was painted with a smaller check I followed the pattern in the stitch guide. I’m not sure I like the metallic I don’t think it covered as well as it should but I tried another copper silk and wool but I didn’t think it had the sparkle that was needed.

15-03-24 bunny overdyeThe pants are stitched with the thread and stitch that is suggested in the stitch guide. You are supposed to use four ply of the strand to stitch the diagonal rows. I think you were given more than enough thread to do this; there are three skeins of overdyed floss in the kit.  I think you could stitch the pants without combining any of the leftover two ply, but it seems like such a waste of thread. And so the Scotsman in me made yet another executive decision, I would stitch the reversed diagonal rows using a random 4 ply of the leftover two plies. To ensure I had a random pull I pulled separated 3 strands and randomly put them all together before I stated stitching the reverse diagonals.  It seems to have worked out so far and I like the effect it gives. We will see how frugal I was when I complete this area, if I have less than 6 ply I will have figured accurately.

I’m almost done with the bunny and so for this Easter may just set him up on the stretcher bars for everyone to enjoy.  I plan on giving bunny a background stitch and then I have an idea for finishing but then I have another year before Easter rolls around again.

Thank you for stopping by to visit, I hope you find time to stitch today or do whatever helps you be creative!

ttfn…sue

Back to Mom & Me

I finished stitching the flowers and leaves and filled in the green leaf areas. I used an overdye for the leaf area and stitched one area at a time. I thought I would go from side to side across the entire piece but I did not like the look and so I frog stitched it out and tried one area at a time. I tried to get each area alike but when I was finished I think the two left are similar and the two right are similar…oh well, it is stitched.

OLYMPUS DIGITAL CAMERA

Up close I am not impressed with the flower area but as you get some distance to the piece I do like the look and since I have a finishing idea in mind (more about this later) I think it will be fine. And anyway as my friend says, “If your close enough to my piece to see my mistakes; you are too close.” So if you are going to be this close to the piece you are too close.

After I finished the flowers I went back and filled in the bunnies and since I had the white thread out I got carried away and stitched the bunny tails in Turkey work. Mom’s tail has longer loops than baby bunny. I thought at first I would trim and brush Mom’s tail but I like the different lengths and think I will leave them both loopy. I probably should have waited until I finished the back ground but, oh well…

I have started the background and am using ThreadworX’s floss. I am puddling the stitches, I really like this technique for overdyes. Puddling keeps thread from developing a striped effect like you can get when you stitch horizontally, vertically or diagonally. The only thing I have found that I have to watch is making sure I don’t develop huge areas of one color. Some overdyes have a tendency to have larger areas of one color than another and if not careful you can develop large areas of one color. Helpful hint: cut out large areas of one color.

Last fall I showed you how to stitch the puddle method with a continuous uncut overdyed thread, like Watercolours (https://sudukc.wordpress.com/2013/10/01/overdye-puddle-stitching/). With ThreadworX it is a slightly bit different because these threads are cut into given OLYMPUS DIGITAL CAMERAlengths of thread. When you open a skein of ThreadworX’s and lay it out there will be an “A” end and a  “B” end and it may appear the same as an overdye that has been cut from an uncut overdyed thread (like Watercolours). The difference is that ThreadworX’s threads are consistently similar where Watercolours may vary a bit as the skein is used because of the dying method.

14-04-25 Mom & Me background stitch aWhen I puddle stitch I randomly pull ply and stitch. I do keep “A” ends together and “B” Ends together; if you don’t then you will get a blended effect and that is another way to stitch with overdyes. For my purposes in this design I am keeping the “A”  ends and “B”  ends together in the needle…BUT I am randomly deciding which ends (“A”  or “B” ) goes into the needle.

14-04-25 Mom & Me background stitch cExample: With one strand of thread, using 2 ply in the needle to stitch, there are three stitching lengths in a thread  per strand: 2 ply A-B, 2 ply A-B, 2 ply A-B (Oh I knew those math classes in school were for something…remember those teachers that said you would use these principles in life?). I divide these threads and place them in three needles 2 ply A-B, 2 ply A-B AND 2 ply B-A. (it could have been any combination…remember that math week on variables…this is an applied use and for all you math geeks out there…it is 5 choices.)  Then I pick a needle stitch with this needle, then I randomly pick another needle and last the final needle (and this variable greatly increases but I missed that day in math class.). I have no idea which is which (well I do but I don’t pay any attention and just stitch). I continue to do this throughout the piece. And I also vary the placement of the stitches so a pattern does not develop.

14-04-25 Mom & Me background stitch bOkay, Math class is over and I need to get back to stitching the background. For this background I chose a four way continental stitched over 2 threads…I wanted an open background that would allow the painted background to interact with the thread. I didn’t want to lay every thread and so I borrowed a technique from Cross Stitcher’s, “Railroading.” Railroading is where you place the needle between two plies as you return the needle to the OLYMPUS DIGITAL CAMERAback of the canvas. I have Cross Stitch friends who can do this with any amount of even plies (2-4-6) but I can only do it successfully with two ply and usually on longer stitches. You can see the technique in the picture.

Hopefully next week will have it finished and then need to decide if I am tackling the finishing or sending it to my trusty finisher…Part of me wants to learn to do this and another part of me says you traded that sewing machine for a laptop and stitching. How many of you tackle your own finishing?

Thank you for stopping by today and I hope you have time to stitch everyday! ttfn…sue