Yesterday my Mother’s day Presents arrived, but it was late and so this morning with a cup of coffee I settled in to look at them
A new pair of tweezers, Pinkett Tweezer. I found out about them in a round about way; Toni Gerdes told another friend about them. And since I love needlework tools I ordered a pair too from A Stitching Shop (www.StitchingShop.com)…they had them in stock.
Pinzette Tweeter
And since I was on their website I checked out the books too. Christine has the best variety of books I have seen. And of course I found a book I have been wanting to see.
Inspirations Book
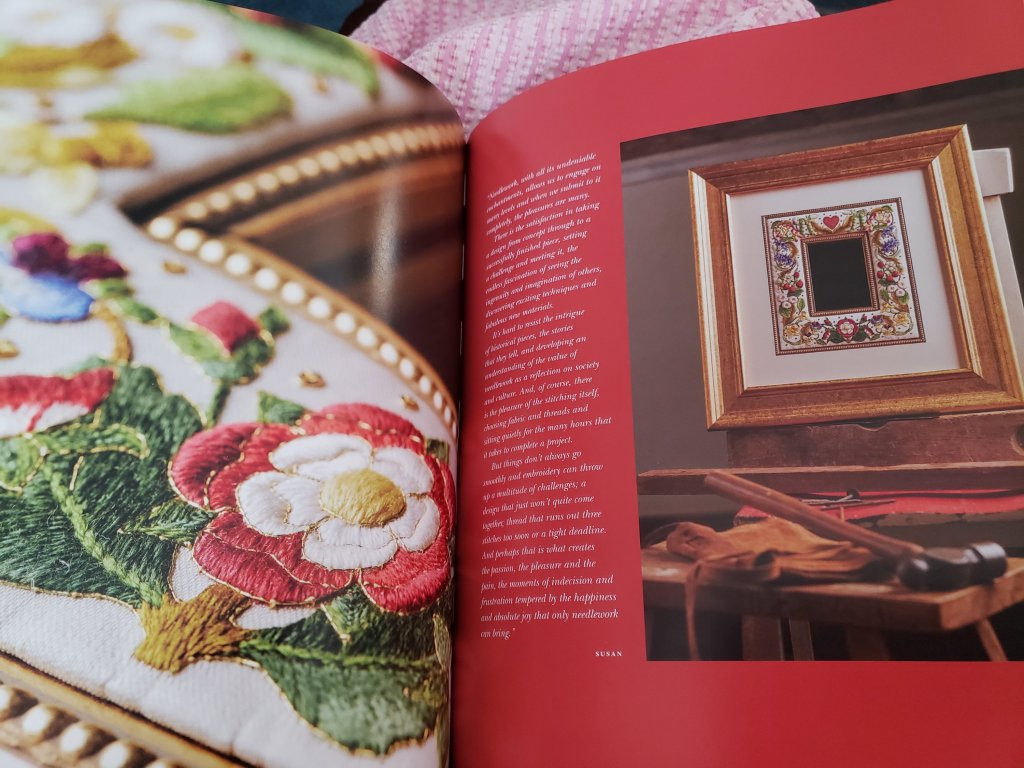
This 200 page book is lovely; there are 12 projects to stitch complete with patterns and instruction. The first 81 pages are the history of Blackstone Creamery, where these projects were photographed. There are also descriptions and artist statements for each of the 12 projects.
Description of projects
The rest of the 200 pages are complete instructions for each of the 12 projects.
Each project starts with a picture, requirements and preparations for the prject
Then there are complete instructions for the project; including stitch diagrams, any aids to help in completing project, and finishing instructions.
And included on inside back cover is a pattern book.
Patterns
I am over the moon about this book; it is a beautiful book! I wanted it because someday I am going to feel qualified to attempt Georgina Bellamy’s (thatembroiderygirl.com) Jewel of the Sea. I saw somewhere(hope I can find it again) where she made this as a needlecase. That would be perfect for me…since I love needlework tools.
Jewel of the Sea
But after looking at this book , there are several projects I would like to try…hope I live long enough. If you would like to see a glimpse of this book and the other two available go to Inspirations web site (Inspirationsstudios.com) and look at them. Then go ask A Stitching Shop (www.StitchingShop.com) if she has it…you’ll save postage from Australia.
I need to get back to my pumpkin. He’s coming along, I am half finished stitching and am really liking it. I will take time a blog about this soon.
I hope you find time to do whatever makes you happiest and creative. And I hope you have time to do it today and every day! ttfn…sue
This post is going to be all about my goldwork class but I would be remiss if I didn’t mention another goldwork book I just puchased. Goldwork and Silk Shading, Inspired by Nature by Hazel Everett. Hazel passed away in 2018 but friend and colleague , Jan Barsby and Hazel’s husband, Adrian Richards collaborated to publish this book in her memory. It is a terrific addition to her first book, Goldwork Techniques, Projects and Pure Inspiration. This book explains how silk work and stumpwork can go hand in hand with goldwork. I loved how the book shows many of the examples done in all gold, all silk, and a combination of the two. It is truly inspirational and will give you many ideas. Another thing I found especially interesting was that all the examples of silk work are stitched using DMC 6 strand floss. I am going to add this book to my previous post about books too
Now about Goldwork Lucky Clover is a class taught by Clara Warschauer (clarastitchingstitching.com) and my first real adventure into goldwork. I have taken a couple other classes, I really just audited these classes and never stitched anthing.
This was a 2 session zoom class and I made up my mind to actually try and keep up. After enrolling Clara sent a kit with all the materials needed to complete this clover and looks like enough materials to complete a second. I was a little concerned that there were no written instructions but Clara assured me that everything would be covered in class and that we would have unlimited access to these videos.
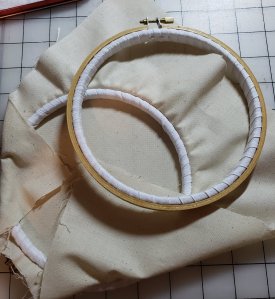
As I mentioned before in my blog (sudukc.wordpress.com/2022/01/14/taking-a-goldwork-class/) Clare had a little prework . Before class we were to wrap our hoops and draw the clover design onto the ground fabric. we needed a light and stand and usual stitching tools. Clara had suggested several tools especially for goldwork and I had these already so I was ready. If you would like to learn about wrapping a embroidery hoop Clara has a video on YouTube (https://www.youtube.com/watch?v=wFzYJPPcWlc&t=26s).
The first session Clara showed us exactly what to do and explained everything very well. In class Clara showed us two methods of padding, stuffing and layering felt. Then we use Supper Pearl Purl to outline the clover. She showed us how to make a lasso needle for helping to take our gold to backside of work and secure. She also has a video for making a lasso needle: https://www.youtube.com/watch?v=ejkiKjkKioI. She also showed how to stitch the stem and how to lay Japanese threads in the first petal.
I had begun stitching with here but by the time she had stitched all the felt in place and started on the outlines, I was still stitching the green clover (step one) to the ground. Needless to say I decided to stop what I was doing and to listen and take notes. I was glad we were going to have access to the viedo too because I was sure I probably missed a hint or two.
So during the first week between classes I diligently went to my stitching nest and stitched my clover, I wanted to keep up and not let the class get ahead of me. One of the major things I learned is that goldwork is not going to be a social stitching piece. You need concentration and and attention to detail for this technique. I imagine it is much like Japanese Embroidery with much attentions to technique and application of technique to truly master this media. I spent about 8-10 hours of stitch time just to complete the first part. But I liked the solace of the stitching time. I lost all sense of time and space.
I completed the homework and was waiting for the next class which took us through the rest of the stitching and how to finishing. This class I just took notes and knew I was in for another 8-10 hours of stitching before I was going to attempt the finishing. I was also happy this class was also taped for our reference too. I think I watched this tape a couple times just for the finishing .
It took me about ten days to complete this project, not because it took me longer to stitch but because I had a couple other commitments and I wanted to have blocks of time to stitch. Once my clover was completed I knew there were quite a few faults but it is my first piece and I will keep practicing. I am going to make another and I know that I overstuffed the first clover and my stem left much to be desired. And I really need practice cutting purl, I had lots of little tags on my chipping that I needed to clip off. And a couple chippings were unusable but I’m going to save them, never know when you might need a pulled purl. But as my friend says; “If you are close enough to my stitching to see my mistakes , you are too close.”
And that’s about it for today. I am working on a new sewing project that I’ll share later, I have loads of finishing needlepoint to do and I’m going to make another clover soon before I start another project. I also need to start a solcial needlepoint I can take to sitch-ins and other places. I did get out a guild project I thought I could do but as I read the instructions I realized this was not a project that I wanted to do, so I will keep the golds and make another clover before I attempt one of the other kits I have in waiting.
Thank You for stopping by again. Hope you find time to do whatever makes you happiest and creative AND I hope you have time to do it today and every day…
My first new adventure for 2022 is a goldwork class. I have several goldwork projects and ideas I would like to do but have had very little instructions in this media.
I audited a class from a local guild teacher, but didn’t do any actual goldwork. Our guild also had a teacher come for a class but it was more of a design class in goldwork than an actual hands on class. And I did computer work for a goldwork class (Golden Petals) taught by Toni Gerdes (www.tonigerdes.com) but I didn’t have time to stitch this one either.
I have 3 or four goldwork kits I’ve purchased and a couple projects on my drawing board I really want to stitch. So although I’m familiar with the technique I have never actually been in hands on class until now.
I am signed up to take a goldwork class with Clara Warschauer (www.clarastitching.com) . It is a small Shamrock and I can hardly wait, class starts Jan 17th.
Before my mother started a new project she would gather up every conceivable supply, tool, book, whatever she thought she might need to successfully complete the project. I am my mother’s daughter in some ways and I have been gathering up supplies for some time. My mother always had everything meticulously organized and although I fight organization I find myself being exactly like she was sometimes. So..
My class project has its own little box with every thing that came in the kit plus I have print off pre-workout instructions, wrapped my hoop and marked my pattern.
I wrapped my hoop with bias tape and drew my Shamrock on the fabric. Both hoop rings are supposed to be wrapped with woven tape ( I bought my tape when I bought my frames), cotton strips of cloth or bias tape. I did this but first one was so tight didn’t think I would get fabric on the frame and be able to tighten screw. So I only wrapped inner hoop on second frame as a back up; but fabric did fit…wonder of wonders.
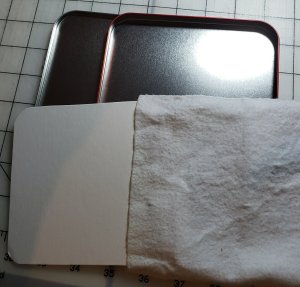
Clara asked that we have cutting board to cut metals. I happen to have one from one of those guild class I audited. It is a computer disk holder, a polishing bag (you used to get these free in hotel rooms to buff your shoes or some high-end make- up companies put some of there products in these soft bags. And my bank gives away eyeglass cleaner cloths that work.) and a piece of card cut to fit box. You also can make on by just cutting a piece of velvet or felt to go around card…or if you are handy with sewing machine, make a bag. Put card in bag and place in tin.. and you have a cutting board with lid …this will be handy if you have extra gold cut and have to stop stitching (heaven forbid.)when you have a box with a lid, just put a lid on it and when you return everything is where it should be. Handy tip for those who have little friend around.
Clara also asked for goldwork scissors. I am covered here, I have every type of scissors imaginable. From top down: double curve, curved blade, snippet scissors, goldwork scissors (serrated edge), new embroidery scissors and surgery scissors ( one blunt tip). I have others types8 handy in my sewing room too.
She also said a mellor and a light box would be nice but optional. I have a mellor and I made my light box. I use a plexiglass see though ruler (made for quilters and used with rotary cutters), fabric weights but four of anything of same height would work and my phone with a white image and full brightness on the screen or a small flashlight to fit under board. Or use window; tape design on window and tape fabric over…nature’s own light box.
A stand is needed and I have stands…floor stand, lap stand and a clamp. Don’t know which I will use yet, but will let you know and why.
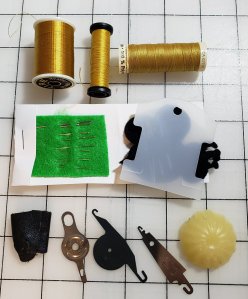
But that’s not all I’ve collected for my class, after all I am my mother’s daugter. I have this carrying case with most all my goldwork tools in one place.
Extra needles… the container holding needles is a Q-tip travel container. You can get them at discount stores or drug stores, they cost about a dollar and you get q-tips too (I think I had quite a supply of q-tips for a while)
I have gold thread( silver thread in drawer), extra felt with spare needles,, a thread bobbin, a thimble, needle threaders (because one does not always work), and beeswax.
Tweezers: read you should learn to use and not touch gold much. The oil from your had may tarnish gold. Also have read to wash hands but don’t use hand lotion…oils again. I have blunt tweezers, pointed tweezers , very pointed tweezers, and bent tweezers.
And miscellaneous stuff that I usually always have when I’m stitching. A light and dark lap cloth; if you use this under your needlepoint makes holes easier to see. I thought it might be useful under cutting board in case some gold pops. My extra eyes…don’t go anywhere to stitch without them. A ruler with metric measurements. And an ort box, although I don’t think any gold will be thrown away. And a good light source. I have several choices plus windows. And finally my stitching buddy; Jiminy has been with me for a long time.
So as you can see I am ready and waiting …can you tell I am excited? I’m going to bring my computer, notebook and phone up to my sewing room this week end to make sure I have good zoom reception otherwise will have to stitch in my office…guess I better clean a spot…it’s still a mess.
I’m also going to read more of the goldwork books I have collected this week-end. I’ll report on these later..
Thank You for stopping by again.
Hope you find time to do whatever makes you happiest today. Used to say stitch but whatever makes you creative, hope you have time to do it today and every day…
I haven’t been ignoring my blog but I have been busy designing needlepoint hearts and making beaded butterflies. But, I have been remiss in writing about my guild’s philanthropic project, Hearts For Hospice.
Guild members (really anyone who wants to help on this project, you do not have to be a guild member) stitch hearts; Sue and her 12 year old Grandson, Jon, make the twists (DMC #3 perle) to finish the hearts, Georgia and Sara (and sometimes we have a finishing day) finish these hearts at no cost and the hearts are donated to three (3) local Hospice Houses, one is a children’s home.
Maybe you saw the article in ANG NeedlePointers, Jan/Feb 2019 and May 2017; Needlepoint Now, January/February 2019, and on Facebook.
It all began when our friend Georgia went over to “The Home” at her retirement community to volunteer. They asked her if she had received her flu shot and of course she had not (doesn’t like them or maybe they don’t like her…can’t remember), so she could not volunteer. A staff member saw hearts Georgia was stitching and inquired about them and asked if she could make more. Knowing she could stitch a heart, she returned home and started making hearts and that’s how it began…one heart at a time.
Within the month she had convinced several of her friends to join her and soon it became a project and another friend, Sue Hart organized us into a philanthropic group and offered the project to our guild as an ongoing philanthropic project.
Side note: did you know that all non-for-profit organizations need a philanthropic program to qualify as a 501(3)(c)? I didn’t but it makes sense if you are a non-for-profit organization that you would do something. I know our national bylaws state that our purpose is to teach, promote and preserve the art of needlepoint but I did not know you need to have an ongoing philanthropic project.
We have encouraged members to just try a stitch and variations. These hearts make great doodle canvases. Then if you take a picture of it you will have a permanent copy and a family will receive a lovely remembrance. We have also encouraged needlepointers to take the painted canvas they thought they couldn’t live without, but have now become less likely to finish and make a heart(s) out of the painted canvas. There are two hearts from a painted canvas in this picture.
Barbara Richardson; a friend of GKCNG members and past president of ANG adapted her heart design for us to use. We use it to teach groups of needlepointers how to start and some first time needlepointers. We even have a class that shows you how to finish these hearts.
Several months ago Colour Complements: https://colourcomplements.com/ embroidery threads sent me samples to hand out to guild members I had several left over and so I stitched hearts with them and sent pictures to Colour Complements. The owner contacted me and I have designed a couple hearts for her use (soon to appear on her website, I think).
This summer, one of the bead groups I belong to posted a beaded butterfly and I stitched those for some hearts. I asked permission of the designer, Patricia Parker to stitch them for other hearts and she gladly gave her permission. So guild members that request butterflies for their hearts will get one and I have made several for the two finishers to use at their discretion.
We (I use this term loosely, because I am but a small part of this endeavor) have been doing this for the last four years and have completed over 1400 hearts. We have received hearts from 26 states and 2 countries. There are at least three other guilds that we know about who have started their own program.
If you or your guild would like the information, contact Sue Hart at Heartsforhospicegkcng@gmail.com
If you have any #5 or #3 perle cotton or #12-16 Kreinik Braid (Ribbons work too), or any thread suitable for cording laying around, it needs to be skeins not cut. And you don’t know what to do with it , Hearts For Hospice would be happy to use it. Just contact me or Sue Hart.
I have designed another heart in two colorways for our Hearts For Hospice program and I will PDF you the instructions for free These hearts used Colour Complements Overdye, DMC #5 perle cotton, and Kreinik #12 braid but any of your stash will work. All I ask is that you please stitch one for our Hearts For Hospice program and return to them. All the information to return to Hearts For Hospice are in the instructions. Thank you.
Thank you for stopping by, I hope you have time to stitch today.
I can share this with you today; the gift has been delivered and you will see it was a surprise and well liked. I’m sure everyone has a friend that is difficult to find a gift to give them, but this is not only about my gift receiving friend but also about my new beading mentor and friend.
I have been very fortunate in my life to have met a handful (maybe a dozen) of people who I consider mentors or inspirations to me. To be a mentor or inspiration to me just means that I want to listen to them lecture, teach, or just watch them create…and I always hope some of their creativeness falls off onto me AND I always learn something from them and I treaure their friendships. This is true of every teacher and mentor I have met and interacted with…all except one.
Cath Thomas is a bead designer and she lives in Switzerland. We have never met in person, but I not only consider her a mentor but also a friend. Let me tell you how we met…
Back in March I happen to be online when Cath posted a picture of her Octavio.
Cath Thomas Octavio
Immediately my friend sent her a message: “Is there a pattern for the octopus? I would like the instructions.”
Well I knew the answer to this and so I immediately sent a private message to Cath, explaining who I was and how I knew my friend and that I would love to tackle this project to give to her for her birthday. Cath responded and said to give her a couple days and she would send me some pictures and notes. She also suggested I purchase her design “Tulip Tassel” from her web shop https://caththomasdesigns.indiemade.com/.
Over to the web shop I went and immediately knew this was meant to be. I was working on a beaded rope that was just getting longer and longer with no intended use. But when I saw the tulip I knew that this was going to be my focal point for the rope. I immediately purchased “Tulip Tassel” downloaded and printed a copy.
I read the instructions and knew I had just crossed over from a novice beaded into deep water; I felt like the kid who barely knows how to swim and finds herself in deep water. I knew this was going to be my first really hard challenge, but I gathered up beads and tried making a tulip. Took it apart and started over again…several times. Finally, for some reason I tried using a dowel I had in my tool box and voila it worked. I made my first tulip. I knew I needed to make another and since things usually work best in threes, three tulips was my goal. Amazingly I had the three tulips completed and the necklace completed in time for Easter, April 21,2019.
In the meantime, Cath had sent me notes and pictures. I had compiled all in a file, printed them, read them AND knew I was in way over my head.
Yet, I persevered. I decide rather than order beads online, sight unseen I would buy locally. This would prove to be my first good choice…if I ran out of beads I could just pop over to the bead shop and resupply. Andrea, my bead shop owner (https://beadboutiquekc.com/) helped me pick out beads and I was on my way.
On my way is a relative term, since I had no idea what I was undertaking. I was lucky, my friend had no idea what I was up to and was living in Florida. I was bound and determined to try to make this for her and so…about Mother’s Day, May 12th I took the plunge. Working the tulips had been a big help but they were in different colors and easier to keep track of the correct order…all these beads were pink. After a couple false starts I finally got the hang of it and was comfortable stitching the head. I even got the eyes in the correct places and she didn’t look cross-eyed .
Wrong size
Then came the legs. Cath had said each leg had taken her about 8 hours, that meant one or two days, maybe three for me. This also took several days because I can’t look at pictures correctly. The legs are 6 beads stitched in a Herringbone round for most of the leg; one end tapers off to a point and the other will be enlarged to connect to the head and beak. I didn’t see or read this so my first leg was too large, and never curled like it would when stitched correctly. My second leg was beaded incorrectly and as I was about to write Cath and tell her I gave up; a light went on. I was on my leg making journey. Each leg did take me several hours and I knew there would be more to come…I had decided not to add the suckers until after I had joined the legs to the body thinking I wouldn’t be catching the thread on them.
I had a deadline July 25th and so I stitched on. I would look at the head and had decided the legs would be joined in two groups of four. I decided I needed to stitch the beak in its ring so I could get a better visual in my mind of how the attachments would work. My beak is not the way it should have been beaded but it was beaded.
By July 4th I was beginning to feel the deadline fast approaching and I was nowhere near ready to assemble. I put everything else aside (housework included, but that was the easy part) and morning until night worked on the octopus. All this time I am sending updates and emails to Cath. Her patience is amazing and her advice invaluable!
As I was finishing the legs I was formulating a plan for assembly and I received an email from Cath saying the beak was not connected to the head. My first reaction was “WHAT!” Not connected, whoever heard of a mouth not connected to the head! After much though and looking at my parts I knew I had to make a decision. I decided I had in my mind seen the
beak connected to the head and the legs connected to both, so I went with it. I stitched the first leg on and it seemed to act okay (flow freely), so I continued. I did realize that not attaching the suckers before assembly was a mistake so I stopped attaching legs and attach suckers to with a 1/2 inch of the ends. I remembered reading in Cath’s notes that she attached more suckers after she assembled all the legs.
I finished my Octavio late July 23rd, two days before I was going to give her away to my friend. I bought a box, sent pictures to Cath and received the nicest complement ever. It brought tears to my eyes and still does!
Takes breath away! I swear, when I saw the first picture, I was moved and really sighed of happiness! You can be really very proud! It is just perfect!
I am very much looking forward to seeing your photos, and to learn what your friend thinks about it.
A huge bravo! I’m truly proud of you, of me, of us!
I will treasure my friendship that I have built with Cath through emails forever. Cath is a remarkable woman and bead artist. She designs constantly, shares her gifts with others and moderates three beading groups on Facebook:
Please keep Cath in your prayers, she is having some health issues and prayers are always helpful. Thank you!
And before anyone askes, I cannot share more than I have here about Octavio. She is not my design and without Cath’s permission I have shared all I can.
And my friend, well I think she was as surprised as I have ever seen her and I know Octavio will have a great new home. Happy Birthday,Nancy!
And that’s why we create. For the friendships we have, the friendships we make; so we can share our time, our talents and our gifts. Thank You for stopping by. I hope you have time to stitch today and every day.
These three little sunflower canvases have been lying on my desk for a couple years and I guess I never blogged about the original design either.
About 2 years ago my guild asked me to stitch a free Laura Perin design. I thought it was a Rainbow Gallery freebie but when I went to look for it to give credit I could not find on either Rainbow Gallery webpage (https://www.rainbowgallery.com/) nor Laura Perin (http://www.laurajperindesigns.net/index.html) webpage. And I’m sorry but I don’t even remember the title of the design.
The guild also wanted me to offer alternative ideas in beading for the center of the sunflower using beads; one guild member called it “messy beading.” Since I didn’t know what “messy beading” was I stitch the design as diagramed and then stitched three other center designs in the beading techniques I was familiar with. I liked all three methods of beading techniques; each technique creates its own look and I can see using in on different canvases for a special effect.
I use Miyuki beads whenever possible, Toho are also excellent beads too. I use mostly Miyuki because that is what I started with and although the beads may be intermixed, there is a very slight size difference. There are many seed beads on the market and they are not all equal; I would stick with Japanese seed bead Manufactures, Mill Hill or a source I knew I could trust. Beading is a whole blog(s) unto itself so I will just say if you are starting beading, buy one manufacturer and stick with them. I will also add an addendum to this if you buy a kit, don’t throw the beads away, use them. We will assume that whoever kits the project uses the best beads available for the project; if you find this to be untrue then substitute your favorite beads for the project.
The first sunflower used round 11/0 seed beads and made loops of beads. This is the technique I would call “messy beading” you string several beads on beading thread and make loops. I like this technique, but it will catch easily and so be careful where you use it. You could secure each loop so that if one loop breaks they all won’t come unraveled.
The next sunflower technique is similar to “French knots on a Stick” but they stand straight up; it could be considered another messy beading technique. It is another technique that will catch easily and so you might want to secure each spike so all will not unravel. Although you can’t see in this picture, nor can you see looking straight on the sunflower I stitched this using two different beads (see diagrams). On the four corners I used a small bugle bead topped with a seed bead. The rest of the beading was stitched using all seed beads. I didn’t think of this until just now but using different lengths of bugle beads would make an interesting effect.
Note: I did not secure either of the above but I am not using where they might be snagged.
And the last sunflower was stitched in basketweave using cylinder beads. It is just basketweave adding a bead to each stitch. What makes this technique special are the beads; they are cylinder seed beads; Miyuki names theirs Delica beads, Toho’s are Aiko, and Mill Hill are Magnifica. I guess you could use regular seed beads but I’m not sure the technique would stand out like it does with the cylinder beads.
I found this Basketweave technique from Associated Talents in their stitch guide section (http://www.atneedlepoint.com/CanvasLookup.asp?Category=Guides). I wrote and asked if I might use this and the owner graciously gave me permission. Since there was not a diagram of this technique I created one. Basketweave done with Delica beads (cylinder beads) is sooooo cool; the light refraction really looks woven.
Okay so that’s why and how I stitched the three little sunflowers….BUT since then these three beaded canvases have been on there little wooden stitching frames were just lying on my desk area gathering dust. The large one is put away waiting for the black box I haven’t found yet; and if all else fails I have a black frame in my stash that will work. One day I did find a black shadow box frame that I thought would be great for them but I didn’t have a mat cut just bought the frame.
And then this January Kimberly Smith posted this fabulous finishing technique for pictures using beads and I knew that my sunflowers had just been waiting for this method. I am so excited about a new way of finishing I learned from Kimberly Smith; you can find the complete instructions here: http://akimberlydesign.blogspot.com/2019/01/sharing-techniques.html
I followed her instructions and the only things I would suggest are:
Start away from a corner; it seemed to make the corner beads lie smoother when you turn the canvas.
Watch for loops of unruly thread when beading…fix immediately! You don’t want unruly threads coming loose and have a hanging bead later.
I wanted no grin through or as little as possible…I didn’t think about this until I had already finished one canvas so I was very careful about marking that canvas. But with my trusty Copic black marker I darkened the canvas to minimize the white grin through. I also bought a piece of black core foam board since I didn’t want any white to be seen.
I thought the hardest part was getting the three little sunflowers in the frame evenly…But unless you have more than one canvas in a frame this should be no problem.
There are two questions I forgot to ask: (If you are reading this please comment or I’ll add an addendum later when I find answers.)
Is there a limit to the size canvas you can use this method?
My canvas was even count and so the corners came out even. How do you compensate for odd count canvas?
NOW I have another finished needlepoint…Yeah! One down many to go….
Hope you all had a Bang up 4th of July.
Thank You for stopping by. I hope you have time to stitch today and every day.
While I was stitching the 1st Communion piece I also remembered that another granddaughter is graduating from high school this May and I probably should stitch something for her too. And maybe I should start thinking about it now. But then I put that idea quickly on the back burner…
But a few weeks ago I was having lunch with friends and they wanted me to go by a needlepoint shop in the area to see some finishing they were picking up. So off we went. While I was there, it was mentioned that I had stitched a 1st Communion piece and I showed the picture in my phone. I also mentioned I had a granddaughter graduating from a local high school. One of the owners mentioned that they paint the cypher for that school in two styles…Oh pleaseeeeee let me look. And yes here was what had been mulling around in my head… I asked if they could have this painted on 8 x 8 inch canvas and leave off the circle outline…sure thing. They took my order and then put the original canvas with it to send it to the painters. I thought this was strange; wouldn’t the artist have a master?
I was still at the shop visiting with friends and I learned that this shop also has an outreach program. The needlepoint shop supports “100 Jobs for 100 Moms” program and has hired women to hand-paint canvases four days a week. What a great idea…
So know I am going to get a canvas with major part of the designing already completed (I will not have to re-invent the wheel) and then I can personalize it for my Granddaughter. And you know what, I’m sure she will appreciate this even more knowing that we helped someone less fortunate in the process of making her special memory.
I love my local shops, they both carry a different variety of things, the help is good, stitchers are friendly and they both have outreach programs. Do visit your local shops often.
I’m thinking about beading the cypher; could use the three beads from Mr & Mrs. I think I might discuss this with the graduate, maybe she would like it finished with her tassel. Ummm—that would give me more time too. I’m liking this better all the time. I will keep you posted on the progress of my graduation gift.
Thank you for stopping by, I hope you have time to stitch today.
ED Note: I was out of my blogging phase when I stitched this and so pictures are incomplete…I am trying to be better now that I am back to blogging about taking pictures as I stitch. But sometimes I get carried away and forget…
After I finished Mr & Mrs I took a couple weeks off and just did knitting or Kumihimo…anything without beads. But one day I was looking through my stash and came across this piece. I have always loved it, it is an adaptation of a Charlie Harper print and I love Charlie Harper prints.
Ann-Strite Kurz (https://www.annstritekurz.com/ ) has always been one of my favorite teachers. If you read Ann’s resume it is very impressive…she is one of those teachers who has forgotten more than some of us will ever learn.
I own many of her books and I follow her article every month, Using Common Stitches in Uncommon Ways, in Needlepoint Now (https://www.needlepointnow.com/). Our guild had her teach an applique class one time and I loved it; I still use the techniques I learned in this class.
I love her work but was never able to get into one of her classes at ANG national seminars…My luck of the draw never seemed to work and most of her classes seemed to go to lottery.
Somewhere along my stitching path I had acquired one of Ann’s teaching pieces, Br-r-r-r-rdbath, (probably a stash sale or someone gave this to me). It has been one of my favorite pieces for a long time and had been waiting it’s turn in my stash, so I pulled it out…time to do an Ann piece.
Ann’s books are so well written that I knew her instructions would be no less and they were everything I expected them to be…excellent. Ann’s instructions and diagrams are some of the best. I had no idea what I had gotten myself into…I was looking for a fun easy stitch but this was going to be a learning piece. But you know what I have always loved this piece so it became my at home project.
First you basted guide lines on the canvas and then I started the design…
First you stitch the Smyrna outlines (dotted lines in picture)…then you started the border designs. The borders (A & B in picture) are truly a lesson in “Using Common Stitches in Uncommon Ways”! If I remember correctly, there were at least four steps to each border and then BEADING. Remember I said I was trying to avoid another beading project? Well at least you waited until the design was completed to add beading maybe I would recover from the Mr & Mrs beading.
Then I started the design part of the piece and every area was a review of a previously learned skill or an adaptation Ann has created to enhance this design (area C the birdbath.) I loved stitching this piece…okay maybe love is a strong word but I liked the challenge it presented. The leaves (D in picture) became a challenge for me and then I decided, this was my piece and I was stitching it for me and so if the leaves were giving me a fit I needed to adapt and overcome. The leaves became my change to the piece; I had stitched the first two (D in picture) as instructed and was having a devil of a time, so the rest of the leaves are my adaptation of the instructions. This was my fun relaxing piece and I was keeping it that way. I’m the only one (and now you too) that notices that the leaves are a bit different …but then aren’t all leaves in nature different?!
The body of the bird was a relaxing stitch, nothing I didn’t know how to do. But the wings were my next challenge. I love the look of Blackwork but it is really a technique you have to study to be really good at it. Ann’s instructions were wonderful and easy to follow. I made a couple mistakes but Blackwork is a technique some spend a lifetime perfecting. If you would like to pursue this technique, there are several books written about this technique. Here are the ones I have in my library:
Ilse Altherr; Reversible Blackwork, Book 1 and Blackwork & Holbein, Book 2
Becky Hogg; Blackwork RSN Essential Sitch Guide.
Marion Scoular; Why Call It Blackwork?, Folio of Blackwork Patterns
Ann Strite-Kurz; The Heart of Blackwork
Leslie Wilkens; Blackwork Made Easy;
Jane Zimmerman; Blackwork Embriodery Patterns, The Art of English Blackwork
By the time this piece was completed and I was ready to start the beading, I had decided that I would add the sequins (you use a bead here to attach the sequins) but the border was going to be sans beading. I liked the look and I was not into that much beading again.
So here is another project under my belt and it is also in a ready-made frame. I really do like framing pieces when I can do it myself, and then they don’t end up in my to finish later pile. So another project is completed but I still have more to catch up and then maybe by summer I will be back to finishing projects or sewing.
I have done three 1st Communion Crosses, each is a bit different, but I still planned them all out on graph paper before stitching.
I plan out on graph paper the name and design before I begin stitching. I use an alphabet that is 9 stitches high for uppercase and 5 stitches high for lowercase letters. Whatever method of framing you decide to use, your design MUST be planned on graph paper. Plan your design out first on graph paper, remember to allow for open space around the design area I usually figure 5 threads on each side for this type of design….although you usually are going to get extra space by choosing a standard mat..
I count the lines of the graph paper (each line represents a thread of canvas) and divide by the needlepoint canvas thread count to see what type of design I might be able to use; i.e. square or rectangle. This will also let you know if you can use a pre-cut mat and frame (my favorite). If I had a long name I might consider making a rectangular piece from the start
For example: a name like Christopher Robin is long…by my quick calculations this rectangle stitching would need minimum 87 by 105 threads. This translates to 87 divided by 18 count canvas equals 4.8333 inches of 5 inch opening and 105 threads divided by 18 count canvas equals 5.833333 opening or 6 inch opening , Since standard mats usually are 5 x 7 inch openings. I would be look for a shadow box frame with a precut mat with a 5×7 inch opening or find a frame I liked and have a 5 x 7 inch mat cut to fit the frame.
The best method is to have your piece stitched when you go to look for the frame. If you are lucky you will find a precut mat and frame; otherwise you may have to have a mat cut to fit a premade frame. But remember sometimes this still does not work and you are going to have to bite the bullet and the piece custom framed. EDNOTE: If you are planning to enter a piece to be judged, then you MUST have the piece custom framed. …There are framing rules too, maybe not rules but guidelines or ratios of mat size to frame size…Your framer will know these, I don’t; I just know if I like the way it looks matted and framed.
Other things I did to make stitching easier for me:
I tent stitch the grape areas first. This gives me an idea how they will look and it is easier to remove tent stitches than it is French or Colonial knots. Then when I stitch the grapes if I am using an overdye I use the puddle stitch technique to stitch the knots. I learned this from John Waddle years ago and blogged about it once but I will repeat it since it was years ago that I wrote about puddle stitching.
Puddle stitch method:
I do not cut the overdye thread in this instance (some overdyes are pre-cut but the method is the same.)
Here is a graphic of a length of an overdye thread; I have numbered each segment with an arbitrary number of stitiches (10-8-12-6-etc…). Notice that there are three circled 10’s; these are the beginning of the repeat. The numbering has no significance in puddle stitching other than to show the repeat and the number of stitches I arbitrarily assigned to each area.
The next graphic shows this overdye thread stitched in Continental Horizontal rows (top left), Basketweave (bottom left) and then puddle stitching on the right. I attached the sequence numbering to all these so you could compare to the first graphic and follow he sequence of stitching. The puddle stitching is a bit hard to follow but you can and there is no method to this it is just a random thing.
Puddle stitching is nothing but a group of stitches randomly placed together to form a puddle of color. You could call this method a glob, blob, whatever you choose to call it…but then it would have to be glob stitching, blob stitching and I like puddle stitching best. Remember this is not my technique I learned it from John Waddell (http://johnwaddellneedlepoint.com/index.html) in his Fun with Overdye class.
If this has confused you more I am sorry but just drop me note and I’ll see if I can do better or take a class from John, he’s really good or maybe your local shop can help you.
Making a twist:
I sometimes make a tiny twist of usually 2 ply floss to be the stem of my flowers or in this case wheat.
Once the twist is make I use a larger needle. I thread the twist into this needle to start stitching. I bring the twist to the front of the canvas leaving the knot on the backside…I know the rule about knots and needlepoint but there are exceptions to every rule.
I’m showing you the back of the my stitching because that’s where all the work can be seen! The free form shape in picture is my beginning knot. The rectangle is the line I couched the twist on the front with second needle using 1 ply floss. And the circle is a picture of how I end this twist.
Ending the twist depends on if there is enough twist to use again. If there is enough twist to use again make two overhang knots as shown in picture and cut between them. This will help keep the stitched twist from becoming lose and it also keeps the remaining twist, twisted. If there is not enough twist to use again just make an overhand knot and clip, leaving the knot on your canvas.
Over the years I have stitched three 1st Communnion Crosses and I have a PDF version of the first cross instructions but have also included information on all three in this newly revised edition. If you are interested, email me (sudu@kc.rr.com) your email and I will send to you a copy; be sure and put 1st communion in subject line or it might go to my junk mail.
I think that’s it for today…but I did score a major coup this week and I’ll tell you more about that next week…
Thank you for stopping by, I hope you have time to stitch today.
After I left my blog post last week I went into design and stitch mode. I have already stitched two other canvases for her brothers but I wanted this one to be a bit more feminine. I also wanted it to fit into the same frame as the others because it comes with a pre-cut mat and all I have to do it stitch and frame. The first one is here: https://sudukc.wordpress.com/category/project/first-communion/
And the only difference between the first and second was the size of the cross. I’ll share more about these three crosses next week when I can think a bit clearer. So please wait to ask me for the PDF version until next week so I can tweak the instructions.
First I re-designed the cross and then I auditioned threads…
some made the final cut others did not…And the threads that made the cut don’t always get the job but at least they are around if needed.
I made some notes, marked the center of the canvas and began stitching.
I made a template of the opening size of the mat so I can make sure the lettering fit…If it didn’t, I would have started over. I stitched the cross first, and then made sure the lettering was going to fit around the cross and within my template dimensions. I was stitching the lettering, going along just fine until I stitched the last side. I needed to move the stitching out one more row. Frog stitching…ugh! Lucky I start in the middle and work to an edge. Trust me this was just luck but to be on the safe side I did leave out a space between day and year and when I stitched April I was prepared to scrunch the letters here too.
I used the template to be sure the lettering was going to fit my opening. Yeah it does and so now I was on to the wreath design around the cross. Again I made a round template for the wreath and basted a curve in each quadrant. I started with the hosts and once they were in to my satisfaction, I started with the lower right quadrant…added the grapes to one quarter, then the wheat. I did the second quarter and then finished the other two at the same time, first stitching the grapes, then the wheat.
Again, I was not the brightest light bulb in the package. Somewhere in the back of my design training I remember someone telling me that if you are right handed and you are trying to do mirror images, it is easier to start with the left side and then finish the right side. Has something to do with your brain and the your predominate hand…the coordination factor. Needless to say I hadn’t done this for the first two quadrants
Once my finishing was completed I needed to frame the piece. Since I stitch on a frame, I had little distortion and I didn’t need to block the piece. So first I cut the piece to the size of the mat and then I trimmed away more to give me room to add a lining fabric behind the canvas. I also cut a lining fabric the same size as the needlepoint canvas.
I use double faced tape, I buy it at the art store and it is archival safe. First I apply the tape next to the mat opening, I removed the protective covering and I place it over the needlepoint centering as I went. Once I am satisfied with the placement I finger press in place. I apply a second round of double sided tape around the edges of the needlepoint canvas and place the lining fabric over this, pulling the lining taut as I go. I finger press the lining on the tape, trim if necessary and then I place
archival art tape over the edges to finish off and hold all in place. I place the matted design in the frame and now all I need to do is wrap for Sunday.
Finished by the skin of my finger.
Next week when I have a little more time I will give you some details of how I stitched this piece and also ideas on how to design your own piece.
Thank you for stopping by, I hope you have time to stitch today. I am stitched out; so I am going out to enjoy the spring weather we are having, it’s not supposed to last. Last Sunday we had snow…nothing much but it was cold. I was stitching so it didn’t bother me, but this week has been nice and then it is supposed to snow again Sunday…what’s with Sundays and snow in April?