Hearts

I haven’t been ignoring my blog but I have been busy designing needlepoint hearts and making beaded butterflies. But, I have been remiss in writing about my guild’s philanthropic project, Hearts For Hospice.

Guild members (really anyone who wants to help on this project, you do not have to be a guild member) stitch hearts; Sue and her 12 year old Grandson, Jon, make the twists (DMC #3 perle) to finish the hearts, Georgia and Sara (and sometimes we have a finishing day) finish these hearts at no cost and the hearts are donated to three (3) local Hospice Houses, one is a children’s home.

Maybe you saw the article in ANG NeedlePointers, Jan/Feb 2019 and May 2017; Needlepoint Now, January/February 2019, and on Facebook.

It all began when our friend Georgia went over to “The Home” at her retirement community to volunteer. They asked her if she had received her flu shot and of course she had not (doesn’t like them or maybe they don’t like her…can’t remember), so she could not volunteer. A staff member saw hearts Georgia was stitching and inquired about them and asked if she could make more.  Knowing she could stitch a heart, she returned home and started making hearts and that’s how it began…one heart at a time.

Within the month she had convinced several of her friends to join her and soon it became a project and another friend, Sue Hart organized us into a philanthropic group and offered the project to our guild as an ongoing philanthropic project.

Side note: did you know that all non-for-profit organizations need a philanthropic program to qualify as a 501(3)(c)? I didn’t but it makes sense if you are a non-for-profit organization that you would do something. I know our national bylaws state that our purpose is to teach, promote and preserve the art of needlepoint but I did not know you need to have an ongoing philanthropic project.

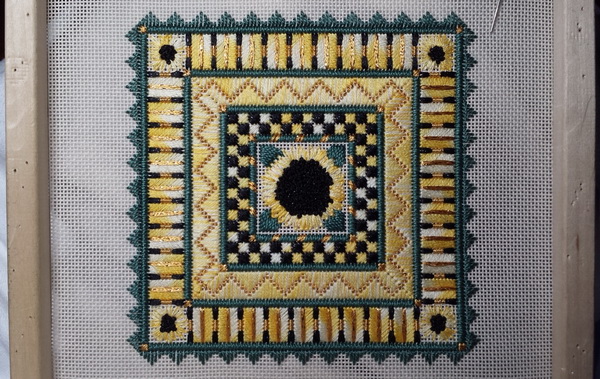
We have encouraged members to just try a stitch and variations. These hearts make great doodle canvases. Then if you take a picture of it you will have a permanent copy and a family will receive a lovely remembrance. We have also encouraged needlepointers to take the painted canvas they thought they couldn’t live without, but have now become less likely to finish and make a heart(s) out of the painted canvas. There are two hearts from a painted canvas in this picture.

Barbara Richardson; a friend of GKCNG members and past president of ANG adapted her heart design for us to use. We use it to teach groups of needlepointers how to start and some first time needlepointers. We even have a class that shows you how to finish these hearts.


Several months ago Colour Complements: https://colourcomplements.com/ embroidery threads sent me samples to hand out to guild members I had several left over and so I stitched hearts with  them and sent pictures to Colour Complements. The owner contacted me and I have designed a couple hearts for her use (soon to appear on her website, I think).


This summer, one of the bead groups I belong to posted a beaded butterfly and I stitched those for some hearts. I asked permission of the designer, Patricia Parker to stitch them for other hearts and she gladly gave her permission. So guild members that request butterflies for their hearts will get one and I have made several for the two finishers to use at their discretion.

We (I use this term loosely, because I am but a small part of this endeavor) have been doing this for the last four years and have completed over 1400 hearts. We have received hearts from 26 states and 2 countries. There are at least three other guilds that we know about who have started their own program.

If you or your guild would like the information, contact Sue Hart at Heartsforhospicegkcng@gmail.com

If you have any #5 or #3 perle cotton or #12-16 Kreinik Braid (Ribbons work too), or any thread suitable for cording laying around, it needs to be skeins not cut. And you don’t know what to do with it , Hearts For Hospice would be happy to use it. Just contact me or Sue Hart.

I have designed another heart in two colorways for our Hearts For Hospice program and I will PDF you the instructions for free These hearts used Colour Complements Overdye, DMC #5 perle cotton, and Kreinik #12 braid but any of your stash will work. All I ask is that you please stitch one for our Hearts For Hospice program and return to them. All the information to return to Hearts For Hospice are in the instructions. Thank you.

Thank you for stopping by, I hope you have time to stitch today.

ttfn…sue

The Tale of Three Sunflower

These three little sunflower canvases have been lying on my desk for a couple years and I guess I never blogged about the original design either.

About 2 years ago my guild asked me to stitch a free Laura Perin design. I thought it was a Rainbow Gallery freebie but when I went to look for it to give credit I could not find on either Rainbow Gallery webpage (https://www.rainbowgallery.com/) nor Laura Perin (http://www.laurajperindesigns.net/index.html) webpage.  And I’m sorry but I don’t even remember the title of the design.

The guild also wanted me to offer alternative ideas in beading for the center of the sunflower using beads; one guild member called it “messy beading.” Since I didn’t know what “messy beading” was I stitch the design as diagramed and then stitched three other center designs in the beading techniques I was familiar with. I liked all three methods of beading techniques; each technique creates its own look and I can see using in on different canvases for a special effect.

I use Miyuki beads whenever possible, Toho are also excellent beads too. I use mostly Miyuki because that is what I started with and although the beads may be intermixed, there is a very slight size difference. There are many seed beads on the market and they are not all equal; I would stick with Japanese seed bead Manufactures, Mill Hill or a source I knew I could trust. Beading is a whole blog(s) unto itself so I will just say if you are starting beading, buy one manufacturer and stick with them. I will also add an addendum to this if you buy a kit, don’t throw the beads away, use them. We will assume that whoever kits the project uses the best beads available for the project; if you find this to be untrue then substitute your favorite beads for the project.

The first sunflower used round 11/0 seed beads and made loops of beads. This is the technique I would call “messy beading” you string several beads on beading thread and make loops. I like this technique, but it will catch easily and so be careful where you use it. You could secure each loop so that if one loop breaks they all won’t come unraveled.


The next sunflower technique is similar to “French knots on a Stick” but they stand straight up; it could be considered another messy beading technique. It is another technique that will catch easily and so you might want to secure each spike so all will not unravel. Although you can’t see in this picture, nor can you see looking straight on the sunflower I stitched this using two different beads (see diagrams). On the four corners I used a small bugle bead topped with a seed bead. The rest of the beading was stitched using all seed beads. I didn’t think of this until just now but using different lengths of bugle beads would make an interesting effect.

Note: I did not secure either of the above but I am not using where they might be snagged.

And the last sunflower was stitched in basketweave using cylinder beads. It is just basketweave adding a bead to each stitch. What makes this technique special are the beads; they are cylinder seed beads; Miyuki names theirs Delica beads, Toho’s are Aiko, and Mill Hill are Magnifica. I guess you could use regular seed beads but I’m not sure the technique would stand out like it does with the cylinder beads.

I found this Basketweave technique from Associated Talents in their stitch guide section (http://www.atneedlepoint.com/CanvasLookup.asp?Category=Guides). I wrote and asked if I might use this and the owner graciously gave me permission. Since there was not a diagram of this technique I created one. Basketweave done with Delica beads (cylinder beads) is sooooo cool; the light refraction really looks woven.


Okay so that’s why and how I stitched the three little sunflowers….BUT since then these three beaded canvases have been on there little wooden stitching frames were just lying on my desk area gathering dust. The large one is put away waiting for the black box I haven’t found yet; and if all else fails I have a black frame in my stash that will work.  One day I did find a black shadow box frame that I thought would be great for them but I didn’t have a mat cut just bought the frame.

And then this January Kimberly Smith posted this fabulous finishing technique for pictures using beads and I knew that my sunflowers had just been waiting for this method. I am so excited about a new way of finishing I learned from Kimberly Smith; you can find the complete instructions here: http://akimberlydesign.blogspot.com/2019/01/sharing-techniques.html

I followed her instructions and the only things I would suggest are:


Start away from a corner; it seemed to make the corner beads lie smoother when you turn the canvas.


Watch for loops of unruly thread when beading…fix immediately! You don’t want unruly threads coming loose and have a hanging bead later.


I wanted no grin through or as little as possible…I didn’t think about this until I had already finished one canvas so I was very careful about marking that canvas. But with my trusty Copic black marker I darkened the canvas to minimize the white grin through. I also bought a piece of black core foam board since I didn’t want any white to be seen.


I thought the hardest part was getting the three little sunflowers in the frame evenly…But unless you have more than one canvas in a frame this should be no problem.


There are two questions I forgot to ask: (If you are reading this please comment or I’ll add an addendum later when I find answers.)

  1. Is there a limit to the size canvas you can use this method?
  2. My canvas was even count and so the corners came out even. How do you compensate for odd count canvas?

NOW I have another finished needlepoint…Yeah! One down many to go….

Hope you all had a Bang up 4th of July.

Thank You for stopping by.  I hope you have time to stitch today and every day.

ttfn…sue

Mr & Mrs canvas designed by Raymond Crawford

Today is March 30 National Stitching-In Day so what a better way than to talk about my last big needlepoint project. I started this project last spring March 2017 but could not share because it was a present for my grandson and his bride on their first anniversary. I had seen this Raymond Crawford (http://www.raymondcrawford.com/) canvas before they were married and with my new love of beading I knew I would have to bead this project. I would guess it took me six months to completely finish this canvas. Beading needlepoint is a long process and why I chose 18 count when 13 count was available I’ll never know.

First I had to find the right beads and I first purchased 11/0 beads for the project but they were too big so back to square one and size 15/0.


I stitched every bead twice in Basketweave style. Why Basketweave? I did not want to stitch Continental and have the canvas warp; I knew blocking would have been impossible. So I took the extra time to stitch Basketweave beading. I used a double strand of beading thread that I had stretched and waxed. If you don’t stretch your beading thread over time it can become loose and your beads will droop; also strech thread before waxing. I stitched every bead twice to secure each bead in place (see diagram). I also started every letter on the right side so my basketweave was always being stitched into a previously work hole. I did this for two reasons: I wanted all the beads to slant same direction and  I was very careful not to pierce thread from previous row. Here are two or more days of stitching on the &, some days I only got in 10 to 15 beads. Beading is a long arduous process for me;  it was tiring on the eyes and also just a slow, labor intensive process.


When I went to stitch the border I noticed on the left there was one empty thread between the M in Mrs and the start of the border, but on the right the & was right next to the border (no empty thread.) This bothered me so I just decided to I stitched the border one thread further out. It wouldn’t show because I planned on stitching all the background with silk. I also changed the direction of the border stitches at the center of the design area; this allowed me to stitch around the corner without compensation. As I recall, it was not an even count divide , so I always try and make the

odd count to the right of center and/or lower of center. I don’t remember if both counts were off or just the left –right borders (top & bottom)   I used Kreinik #12 braid in 3 colors: 221, 202HL and 102 and the stitch was a Diagonal Gobelin over 2 threads.

I stitched the background last in basketweave with 4 ply Rainbow Gallery Splendor S800.

It seemed like it took me forever to stitch, but I love they way it looks finished. I had a mat made and   framed it myself and it now is safely residing in Michigan.

When I gather up another project I did for my guild I will share the different methods of beading needlepoint with you.

After I finished this project, I thought I would swear off beading forever…but forever is a long long time. 😉

Have a blessed Passover or Happy Easter.

Thank you for stopping by, I hope you have time to stitch today.

ttfn…sue


Melissa Shirley Wicked: Embellishing

Over the week-end went to a bead show, bought some beads for projects (like I need more projects), but like I say want has nothing to do with need., so I indulged myself. Funny thing is when I got home I remembered I had purchased a bead project last year. But do you think I have found where I put that project? A blog all of its own! I’ve looked a few places but still haven’t found it, but it will turn up…maybe much later. Anyway had a good time at the Bead-Blast.; look forward to next year.

Also went to out 1st art fair of the year. Brookside annual art Fair was this week-end (http://www.brooksidekc.org/art-annual) 32 years and I bet I have been to most. It is just a fun way to spend the afternoon or evening. There is always something to see and I usually come home with something too. This year I did not get anything but the art was very inspiring and my two favorites were Gwen Bennett’s Feather Art (http://gwenfeathers.com/)…these were beautiful. And after I got home and read about her art was even more impressed. And my other favorite was Julie Powell Beading (https://www.juliepowelldesigns.com/)…I will never be this good. Two reasons: My first love is needlepoint and I just don’t have the time or patience.

But it was a beutiful week-end (no rain) and we had fun.

I left most of the attachments, bullion knots and all the beading to the very end, I didn’t want to take the chance I would catch other threads on them and either snag the thread or worse still pull the embellishment or bead out of whack.

I have several Bullion knot needles I got from needlework shop. Colonial Needle distributes them and I blogged about them a couple times (https://sudukc.wordpress.com/2015/02/08/hari-kuyo-broken-needle-celebration/ ) or (https://sudukc.wordpress.com/category/needlework-tools/needles-needlework-tools/bullion-needle/). These needles are a size 20 and so they make a pretty good sized Bullion Knot.

I started with the Letter “K”. I decided the Bullion Needles were too large for the curly-q on top of the pumpkin and the bird’s feet, I used a #24 Tapestry needle. I stitched the curly-q before I stitched the birds feet; it is a very long bullion and I gave it a twist or loop.  After curly-q I added the bird’s feet, more Bullion Knots that I stitched over and around the green curly-q, still using the #24 needle. I left the curly-q above the bird’s wing and the wing to apply later.

I stitched the red veins for the eyeball in Bullion knots using the long Bullion needles I stitched these into a center whole that I had enlarged with and awl (or larger Tapestry needle) to accommodate the eyeball I would attach later. Notice these veins go over the outline of the letter

Next Letter “C” and the legs of the spider. I used a #24 needle here too as I wanted the legs to be small.

And finally the Letter “I”, this had almost the whole top half of the letter unstitched. Using a Bullion needle I made a short Bullion for the top of the pumpkin at the bottom of the “I”. Then I made Bullions using the Bullion needles and made them looser than normal so they looked like curls. I made some at the top of her head too and these I made tighter so the brim of the hat could lay over them.

Then it came time to tackle the hat and flower on the Letter “I”. The hat was a padded ultra-suede applique with beading. I decided to applique the hat and only to tack the brim at the left side outside the letter and the right side on the tip also. The right side is also held in place by the flower. Next I did the ruched petals of the flowers using a flat braid thread and pulling one of the plies.  I left the hat beading and center of flower until I was finished with all the letters.

Two of the areas had a memory wire thread applied to the canvas; the pumpkin in the “W” and above the bird in the “K”.  Memory wire thread is a thread with a fine wire hidden within it; some wires the wire is like one of the plies and other wire threads are wrapped wire with thread. I don’t know that one is any better than another, this was the first time I had used them. My only experience with wire before had been to use in finishing to make an ornament bend, so it looked like ribbon candy.  First I cut two 3-4″ pieces of the memory wire, then I wrapped them tightly around a small knitting needle. I could have used the Bullion needle, a #18 or 20 Tapestry needle, or even the end of a laying tool; just anything that would coil the wire. On one end, I pulled enough back out straight to tie an Overhand Knot close to the coiled thread at one end; I also placed a small drop of Fray Check on the end to keep it from coming loose. I threaded a #26 needle with 1 ply of matching floss (you could use matching sewing thread) to secure the wire in place on the front of the canvas as well as to secure the tail to the back of the canvas.

To place the wire on the pumpkin on the “W” and above the bird on the “K” I used an #18-20 needle or laying tool.  I opened a space in the canvas to plunge the open end of one of the wired threads to the back of the canvas. I pulled the wire to the desired length and secured with at least one couching stitch on the front; then I turned the canvas over, left about an inch and half, cut excess and tacked the remainder securely to back of canvas.

Beading: There were two types of beads on this canvas; regular size 11 or 15 seed beads and then glass eyes on long pins. Go to Etsy and search for glass eye beads on a long pin, they come in all sizes and colors. Here’s one place: https://www.etsy.com/shop/TheWoolenWagon?ref=l2-shopheader-name. I’m sure you could find even the one used for the eyeball in letter “K”; I had smaller green one for the cat’s eye in letter “W”, larger green pair for the witch in letter “I” and amber ones for a bat in letter “D” and a solid black one for the bird in letter “K”.  These all came in the thread kit, so I don’t know the sizes. You were to place these in the proper place through the front of the canvas, with needle nose pliers bend the wire down into place and the secure with thread on the back. Since I had never done this before I was a bit apprehensive…I didn’t want to get into the wrong place on the front, break a pin bending it on the back, or after I secured to back finding the bead looked wrongly placed on the canvas. You guessed it, I left these until I could do nothing else.

I first did all the stars on the letters, then the bat eyes on letter “D”, and the skull on the witch’s dress on letter “I”. For the stars, bat eyes and skull I used the double thread, lasso method. I referred to the unstitched pictures of the canvas for placement of the stars; I did move a star to the nearest over one stitch of the Nobuko so I did not disturb the over 3 stitches. The other beading was on the letter “I” were the center of the flower, and it was just piling beads up to make a center. Then there were the beads on the hat, they were supposed to be Peyote stitched but at that time I did not know how to Peyote stitch (I just learned last week); so I just strung five beads by row and stitched them on the hat.


And then I attached the wing of the bird. I attached it at the top, poked the wires through the canvas ,  bent the wired down and secure with thread to stitching on the back. Then on the front I bent just a bit to give the curve of the wing.


When there was nothing left but the glass eye beads I tackled them I started with the cat in letter “W” because I figured if I broke this bead I could use a metallic braid and make a French knot. Then I did the bat in letter “D” and the black eye in the bird of letter “K”, same thinking here. By know I was pretty sure I could do this and so I did the witch’s eyes letter I and then the big eyeball in letter “K”. They all turned out well, the big eyeball has a tendency to flop but I’m the only one it seems to bother.


And “Wicked” was stitched!

Thank you for stopping by, I hope you have time to stitch today.

ttfn…sue

Kumihimo Braiding

Let’s begin to catch up…

My friends and I love a shop in Weston, MO; Florilegium (http://florilegium.com/). The owner Gretchen is wonderful and so creative. You just want to spend time with her hoping that the excess creativity will fall off onto you. And Cathy the shop manager is the sweetest person on earth; she always has a smile on her face and never seems to get rattled when we all descend on her at once.  It is the most fun, creative, relaxing place on earth! Go explore the website and you will get a feel for the place. But like I’ve said before…If you fly into Kansas City airport, make sure you have a three hour layover and make the trip to Weston (maybe 30 minutes north of the airport)…maybe you should just spend the night at a Bed & Breakfast in Weston…there is so much to do there but Florilegium will captivate your heart if you are a needlework person or just a creative soul. Also make sure you are here the later part of the week…I don’t think they are open on Monday-Tuesday and maybe Wednesday…but you can call and if someone is going to be at the shop, they will let you in.

But back to the catch up…My friend Nancy and I drove up one day for something to do and Gretchen taught us her method of Kumihimo braid. It is really an old technique, and of course many cultures have a braiding techniques also . Kumihimo braiding can be as simple or as complicated as you choose to make it. Like any technique the more you practice the technique, the more proficient you become. I have seen people who do these braids and never look at the pattern. They are really good and get the count down perfectly; they can start and stop anywhere while making their pattern and never mess up. There is a rhythmic method to the patterns you make and can be very relaxing once you get that rhythm in your head.  I have to really concentrate if I am doing a pattern design; I have to stop at the end of a round so when I pick it up again I don’t mess up the pattern. I think that is why I like the Gretchen methods of Kumihimo best, but I will always be a novice.

KumiSq01b
But of course, Gretchen had made it fun and easy and we were hooked. We came home and taught it to all our friends (One person even made a cording to use to finish a piece of needlepoint.)


Nancy collected supplies for us, we had round and square Kumihmo boards; you use the round disk for round braids and the square disk makes flat braids, they also come in different sizes for small and large braids.

OLYMPUS DIGITAL CAMERAYou need bobbins to roll your looooong lengths of yarn on (save bath tissue cardboards…they make good bobbins for large yearns and large amounts of yarn).  So we have bobbins

OLYMPUS DIGITAL CAMERA


We collected yarns of all types and have a bag of these too.

I had books (surprise, surprise, surprise) in my library and so I did a study of Kumihimo and even took yarn and stitched different braid patterns for everyone to see. Books in my library: (NOTE- all my books are without beads, but if you check Amazon.com there are lots with beading…it seems to be a big thing right now)OLYMPUS DIGITAL CAMERA

Kumihimo Japanese Silk Braiding Technique by Catherine Martin,

OLYMPUS DIGITAL CAMERACreative Kumihimo by Jacqui Carey,

OLYMPUS DIGITAL CAMERA
and Braids by Roderick Owens.


I like them all but the last two are my favorites because they have color pictures of the braids.


OLYMPUS DIGITAL CAMERA

Nancy even indulged me with and authentic Kumihimo stand. It is beautiful and I use it when I am not braiding to hold my current project or it just sits in my studio to remind me of the fun times friends have together and are always pushing our creativity to learn new techniques.

And even though I am a novice and will OLYMPUS DIGITAL CAMERAprobably never be a more than dabbler in this technique, I knew I was hooked when I had a lunch box and bag for my supplies. In my lunch box I keep a pair of working scissors, a tape measure, weights, the different disks I have and my current project. In my bag are different sized bobbins, some sample braids I have made to see patterns and the yarn for these sample braids.

I enjoy making the braids for projects, but I will tell you this method takes more yarn and time than making a twisted cord. The advantage to this is you can make a pattern braid or just a braid using many of the threads used in a project. Remember when you are planning this that you will need threads that are available in skeins; cut threads will not work. And if it is a large project you may have to make a couple braids to complete project.

OLYMPUS DIGITAL CAMERA
I made a braid for a Christmas present and it turned out to be too large for the project. So saved it, and I am planning on using it for cording on a pillow I just finished stitching.


Here are some other braids I’ve played with:
OLYMPUS DIGITAL CAMERAThis is the one I finally made for gift I made last year. It is just #5 perle cotton.


This is my pink flat braid I started with Gretchen at Florilegium.OLYMPUS DIGITAL CAMERA
I am not sure what I will do with this when complete but it would be cool appliqued to a jacket or used in a crazy quilt design some way.

These are samples I have made of design patterns using suggested colors so I could follow the pattern.

I have my bag and supplies and when inspiration strikes I will be ready to begin. I think it would be interesting to make several Kumihimo braids and then braid these braids together to make an thicker Kumihimo braid to use and a garland or intertwine in a wreath…I can even see making a Kumihimo braid to use at a lanyard for a cool bead or even a beading project. I even see making a braid to couch in needlepoint…oh so many ideas so little time.

Needlepoint will always be my first and main love but I think in order to expand or creativity we need to explore other techniques. It doesn’t mean we will ever be as adapt as the person who loves their chosen technique; but at least we will be able to recognize it when we see it and we will have at least a passing knowledge of how it is done. And sometimes in just knowing the method, inspiration will strike and we will be able to adapt one technique to our chosen method of stitching and make something really creative.

Thank you for stopping by, I hope you have time to stitch today or do whatever your chosen technique is!

ttfn…sue

Blue Bird Flowers: Rest of the Flowers

Please keep France in your thoughts and  prayers. Our world needs more peacemakers and less hate mongers.

I’m running a few weeks maybe a month behind in my postings verses my stitching. Most of these flowers were stitched during Major League playoffs and World Series but I can’t write that fast. I don’t know how some of the needlepoint ladies post almost every day…I’m lucky to do one a week. But that’s a whole other story.

2015-18-12 BB o stitch guide

2015-18-12 BB j green flower 1I started the green flowers (#7 Stitch guide above) by stitching all centers first in French Knots with yellow floss. Then around the French Knots I used blue #12 perle to make Cast on Bullion Knots. If you all have been following me for any time you will remember back in February I told you about the new needles I bought

(https://sudukc.wordpress.com/2015/02/08/hari-kuyo-broken-needle-celebration/). They have been lying around my stitching nests

OLYMPUS DIGITAL CAMERA

waiting to be tried. So I decided this was a good area to experiment with these not so new needles. I used the Chenille needles to make these Cast-on Bullions in the green flowers. Cast-on Bullions are different from Bullions Knots: Bullion Knots you just wrap the thread around the needle; with Cast-on Bullions you twist the thread like you were casting on stitches for knitting. Depending on how you do this casting on decides how the Cast-on 2015-18-12 BB d Cast onBullion will look. Casting on the same turn every stitch will make the bullion twist in a corkscrew like manner. Casting on every other turn will give you a more jagged turns. These knots were fun to do but time consuming. Then I filled in the green areas with Woven Plaited Stitch and then more Bullions in white perle. I think these flowers took me the four American 2015-18-12 BB e BullionLeague Games to stitch.


2015-18-12 BB f Cast on 1 2015-18-12 BB g Cast on 2 2015-18-12 BB h Cast on 3 2015-18-12 BB i Cast on 4


2015-18-12 BB k green flower 2The other green flower on the wing was French Knots and the Woven Plait …the Bullions had done me in by then. This flower was stitched with Kreinik green and Confetti pink, perle cotton and floss.


OLYMPUS DIGITAL CAMERA

Another night I stitched the large yellow flowers on a wing and small side piece. I used yellow silk ribbon again to stitch French knots on stick for the petals and then filled these in with either White perle (small side) or Confetti pink French knots and embellished both with pink beads on the white and green beds on the pink.


2015-18-12 BB m spider webAnd then I was down to the three small yellow flowers. I had cut too long a yellow ribbon and so I decided to make spider web flowers with
yellow and pink silk ribbon. I made the base out of perle. These were fun to stitch while
watching the Word Series.
Finally I was done with the flowers but still needed to go back and fill in blue areas around flowers with more basketweave. Next week is Thanksgiving and we will finish up the Melissa Shirley Blue Stitching Bird…

Thank you for stopping by… I hope you find time to stitch today

ttfn…sue

Blue Bird Flowers: More Flowers

I am really not liking these flowers now. I think it is because I am ready to move on to other stitching and the blue bird has a bunch more stitching before it is ready for the finishers.

I was working on a piece at a time but that seems kind of counterproductive. I don’t seem to get into a rhythm, so I’ve sorta decided to work by color and get these flowers stitched.

2015-11-12 BB aThe pink stitches were first in this new method; there was just a single pink flower  (#4) on the large side piece. I stitched the green area in a woven stitch using #4
Kreinik Braid. Truthfully, this is a green no longer being produced, but I think this is an excellent way to use your stash and should I run out of #4 I’m sure I also have a spool of #8 2015-11-12 BB b pinkbraid and who but me is going to notice. In fact if you look at the pictures, the magenta Kreinik I used is Confetti Pink 042 and I believe this is one of the colors Kreinik is phasing out. I happen to love it and have it in every size so if I ran out I used another size. I have even been known to twist ribbon in the needle to use as braid.

But back to the flowers…The border is a Freeform Satin using Neon Rays, so I had to lay the Neon Rays. But the center is my favorite. I love to do French Knots and so both the white and read areas are stitched in French Knots. I used the Confetti Pink 042 first and covered most of the area, then added a few white perle French Knots around the edges.
2015-11-12 BB d redThere are four red flowers: 2 large (#6: one on the wing and one on the large side piece) and 2 small red flowers (#5: one on the large side piece and one on a wing) I’m not wild about all the white around the flowers (see stitch placement picture) so sometimes I just stitch over these areas with the petal color. The small red flower is stitched using all French Knots (yes I am on a roll). I stitched from the center out with yellow floss, Kreinik Confetti Pink 042, and white perle; then added beads.

2015-11-12 BB c redAnd since I am on the French knot making roll, why stop? I decided that since I was not found of doing satin stitch, French Knots on a Stick would do nicely for the petals of the red flowers. In case you hadn’t noticed all the red flowers are really Confetti Pink, and guess what the Needlepoint Police have not shown up at my door yet…and if they do I’m not answering the door!  And yes the centers are filled with more French Knots using green Kreinik, yellow floss and pink beads.

Can you tell I’m losing interest in this piece? I’ll be back next week to finish up the flowers…I am bound and determined to be done with this piece by Thanksgiving…I have too many other canvases to stitch….not to mention the original ideas floating around in my head.

Thank you for stopping by… I hope you find time to stitch today

ttfn…sue

Blue Bird Flowers: Loopy Ribbon

2015-11-05 BB us2015-11-05 BB blue

2015-11-05 BB hillIt’s been a hectic month around Kansas City. In case you haven’t heard, Kansas City Boys in Blue (AKA: Kansas City Royals) won the World Series. It was quite a month…I watched every game starting pitch to last out and one night it was late. But last Tuesday my husband and I headed out to see the Boys in Blue. We went to Union Station and staked out our spot and then we would wander around one at a time (didn’t want to lose our nest) to see the festivities. It was cool to be part of this; I don’t think I say one person without a smile on their face and blue was the color of the day. People watching is a fun thing to do.

Didn’t take my flowers with me but I am working on them…maybe now that the Boys in Blue are taking a vacation I can get some stitching completed.

2015-11-05 BB a loopI decided to try the loop stitch with ribbon. Thought that sounded pretty simple…I guess not or I need lots more practice. I didn’t like the way it looked and so after having it half way stitched removed it, threw away that piece of ribbon. It is true that if you remove ribbon you MUST start over with new ribbon. Silk ribbon is not forgiving and will show every piercing of the ribbon…just like Congress cloth. I  guess if you want the “Shabby Chic” look you could reuse the ribbon.

2015-11-05 BB ironI used short lengths of ribbon, 12-15 inches. I ironed each ribbon…

Side note: I can’t remember if I told you all this before or not but this is the coolest trick. I learned this from Lois Kershner (http://www.loiskershner.com/home) in a class she taught at out guild. She irons her stranded silks; it makes them lie smoother on the canvas. I decided to try it with the ribbon (honestly I think I read that you should do this in one of the ribbon books) but it takes the kinks 2015-11-05 BB b loopout of the ribbon. Then I decided that it might work for any thread and you wouldn’t even necessarily need to turn on the heat. So I keep this handy little tool in close to my stitching nest and I iron whichever thread I think necessary. I am also looking for a portable hair 2015-11-05 BB c loopiron…illuminating the cord would make it even handier.

I decided to do the loop stitch like a Turkey work stitch and then I could better control where the loop is going. It is definitely harder on the ribbon and it took a bit of yanking 2015-11-05 BB d loopsometimes to get the needle to come through the ribbon and canvas, even with the chenille needle.

What I have learned is that ribbon work is a technique unto its self and I am a novice at this and need a lot more studying and practice. I think the rest of the flowers I am going to stick to the stitches I really know. Many of these stitches are used with Ribbon work and some are even stitched with ribbon, but for now I am going to go with what I know. Later this fall and winter I will re-visit the ribbon work books and try again, but right now I have too many stitching projects piling up to do this technique justice.

I finished the ribbon loops and filled the center with French knots stitched with Kreinik braid.

Thank you for stopping by… I hope you find time to stitch today

ttfn…sue

Blue Bird Flowers

Did you think I’d never get back to the flowers? So did I but here we go…

I read all my Ribbon books and decided for now to play it by gut feeling. I’ve gathered up many different types of ribbons type threads (i.e. Kreinik ribbons and Fyre Werks, Neon Rays, Sparkle Rays from Rainbow Gallery) and silk ribbons that were in my stash. The Ribbon books say the ribbon should fit the size of the ground and also the size of the flower being made. Common sizes (from smallest to largest) are 2mm-4mm-7mm and 13mm. All my ribbons are 4mm so I will be limited to their use according to ribbon books. Gathered these up too along with a few beads and metallic braids to add to the mix.

The first flowers I did were ruche ribbons. I found the word “ruche” spelled two different ways; one with a “c” and the other with an “s” and an accent mark over the “e”. I preferred the ruche spelling and so that is what we are using. The “s” spelling reminded me of rush as in hurry up and trust me rushing is not something you want to do when stitching these flowers.

For all the flowers I used a Chenille needle. Two reasons: 1. Wanted to pierce ribbon thread onto the needle and 2. thought if I had to pierce canvas threads would be easier to do so with a chenille needle. And most importantly, it worked for me…ALWAYS do what you are comfortable doing…if you force your needlework you will not like it. Remember this is supposed to be fun!

2015-10-21 BB f ruche

2015-10-21 BB a rucheI did the small red flowers first using Neon Rays (nothing like jumping in feet first) for these red flowers. Neon Rays is hard to control without ruching it …so ruching it just made it more difficult to control.  So I just ruched the thread and piled it on the area and couched it down until I liked it. I added

OLYMPUS DIGITAL CAMERA

a bead and then moved on to the white flowers.  Thank goodness there were only two of these!

I realized I was in much too much of a hurry for this type of stitching; I was rushing the ruching!

2015-10-21 BB c ruche
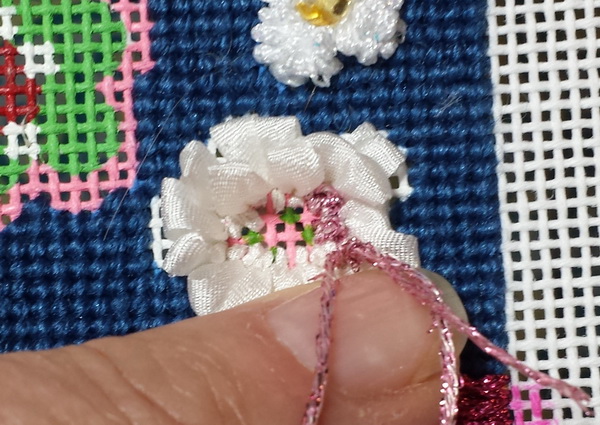
So I took a deep breath and started the white flowers. I used Sparkle Rays for these flowers and noticed as I was pulling a thread of the
Sparkle Rays that this thread would ruche flat. So I decided to try and place in a controlled manner. I used other needles to place the ruched Sparkle Rays and then using 1 ply of floss couched the ribbon in place. I like this look and 2015-10-21 BB d rucheyou can really see how ruching works. I bet you can control ribbon like this too, will have to try different ways of doing this.

I finished the white flowers  with either green or gold beads. Oh btw, look out needlepoint police; I knotted 2015-10-21 BB e ruchethe ruched thread on the back. I wanted to be sure this thread didn’t come loose on either end. And since I am finishing it too, it is my piece I can do what I want!

Thank you for stopping by… I hope you find time to stitch today!    ttfn…sue

Books on Ribbon Embroidery, Bullions and other creative stitches:

Here is a list of some of the books I am consulting. Some I have had just for the different embroidery stitches used to make flowers, some are specific to bullions and others are all about ribbons. And there are others, these are just the ones I pulled for the Blue Bird project.

I have three Hard to Find Book stores in my area and I never go by one that I don’t stop…never know what you will find (and I usually do too.)  I like to see the book before I purchase it. I want technique instructions rather than project books. I check several online sources for needlework books too and I price compare:

Abe Bookseller: http://www.abebooks.com

Amazon: http://www.amazon.com

Hard-to-Find Needlework Books: http://www.needleworkbooks.com

Ruth Kern Books: http://www.ruthkernbooks.com

The books in my library: I wouldn’t list them here if I didn’t like them but some are better than others.

A-Z Ribbon WorkA-Z of Ribbon Embroidery. Country Bumkin Publications. Susan Gardner, Editor-at Large, Quilter’s Resourses, Inc.; 2003 Illinois.

This book is out of print but if you are patient and check often you can get a deal on Amazon or Abe Books and I understand they are going to update and reissue this soon. But it is a staple for learning  Ifa picture is worth a 1000 words then this book is worth every penny you pay for it. There are pictures for every stitch and technique. Excellent Book

A-Z BullionsA-Z of Bullions. Country Bumkin Publications. Inspirations Magazine Publishers. Country Bumpkin Publications. 1999. Australia.

The instructions are clear and the pictures are wonderful. This book is strictly bullions, bullions of every kind. Again the pictures make the directions clear and concise. How can you go wrong with a book published by Inspirations Magazine?

American School of NeedleworkAmerican School of Needlework. ASN Publishing. California.

An Encyclopedia of Ribbon Embroidery Fruits, Vegetables & Herbs #3409. 1997.

An Encyclopedia of Ribbon Embroidery Holiday Designs #3410. 1997.

The Big Book of Little Ribbon Embroidery Designs #3411. 1998.

Encyclopedia of Ribbon Embroidery Borders #3412. 1999.

All these books are nice and they all have pictures to help.


Bradford Book Jenny Bradford. Textured Embroidery. Milner Craft Series. England. 1994.

A  book on Decorative stitching, it has nice drawings and projects.


Victoria Brown BooksVictoria Adams Brown. Watson-Guptill Publications. New York.

The Complete Guide to Silk Ribbon Embroidery. 1996.

It is a basic Ribbon work book,  full of how to pictures and projects.

The New Ribbon Embroidery. 1997.

This book takes ribbon work to the next level. Dying ribbons, making ribbons, etc. Plenty of eye candy but not for the beginner. I like it but I like to push the envelop too.

book cableSheena Cable. Silk Ribbon Embroidery. A Reader’s Digest Book. NY. 1996.

Mostly projects with pictures and diagrams.


Ann CoxAnn Cox. The Handbook of Sik Emroidery. Search Press. England. 2010.

This is a small book (same size as the new Royal School of Needlework books) and it is material from Ann’s two other books: Beginner’s Guide to Ribbon Embroidery and Silk Ribbon Embroidery Designs & Techniques (neither of these do I have). This book  is full of pictures and instructions for ribbon work techniques. I would recommend it.

Heather JoynesHeather Joynes. The Complete Book of Ribbon Embroidery. Kangaroo Press. Australia.1993.

Another book on ribbon work. Has pictures and clear instuctions. Ms Joynes is one of the experts on this subjecy and her books are reccomended in many bibliographies.

River SilksPaul E Krynicki. “OOOOOH”. The Essentials of Ribbon Needlepoint with River Silks 100% Silk Ribbon.Self published.  2006.

If you are using River Silk Ribbons you may want to read this book. It explains how to use RiverSilk Ribbons. It was written for RiverSilk ribbons only. When you order this book you will also receive a spool of Ribbon Silk and a doodle canvas to play.

Lampe Diana Lampe. Sally Milner Publishing. Austrailia.

Embroider A Garden. 1995.

Embroidered Garden Flowers. 1997. with Jane Fisk.

            Embroidery from the garden. 1997.

Diana Lampe’s books are decorative stitches…Any of these books are nice if you are doing a lot of decorative flowers.

Montano silkJudith Baker Montano. C & T Publishing. California

Silk Ribbon Embroidery. 1993

This is eye candy for the ribbon world. Judith knows the rules, bends the rules and does inovative things. I have all the books listed her and look at them for information and inspiration.  Some of Judith other books… these are either inspiration and or quilting techniques.

Montao othersCrazy Quilt Odyssey. 1991.

The Art of Silk Ribbon Embroidery. 1993.

Elegant Stitches. 1995.

Free-Form Embroidery. 2012.

TrottPat.Trott. Three Dimensional  Embroidery Stitches. Search Press. England. 2005.

This book is similar to Diana Lampe’s books but with more and different techniques explored. I like it but it may not be for the beginner to decorative stitching.

AnchorSue Whiting. The Anchor Book of Ribbon Embroidery. David & Charles. England. 1997.

An old book but a goody. Small, 4 x 4 inches, will fit in your stitching bag. Has a complete list of stitches with explanation, drawing and picture. It is really inexpensive and I would recommend for beginning study of ribbon work and library.
Brazilian Embroidery Books: I have had these for years. Brazilian Embroidery Chapman was basically small embroidery (decorative stitches) flowers done with rayon floss. I used them to stitch on denim shirts in the 1980’s.


Floss Flowers, Book 1
. Virginia Chapman. !mpact Presentations. Oregon. 1988 This book was created basically for Brazilian Embroidery and covers a multitude of ways to use bullions as the cover photo attests.

Brazilian booksThe Bossa Nova rose and Friends. Mary Clark and Vee Wedoo. self published, Colorado. 1980.

Hand drawings , project book, a nice book if you can find it but not a necessary one.

Brazilian Stitchery, Instruction Book 1, Janice Gerst Levine and Patricia Von Coelln. American Crewel and Canvas Studio. New York. 1985. Another project book with photos  and line drawings.

Dimensional Embroidery, Book 2&3. Zeann Aguilar. self Published. Utah, 1980. Basic stitches and patterns.

Brazilian Embroidery Instructions. Barbara Demke Johnson. Hawkes Publishing. Utah. 1980. Basic stitches and patterns.

By the way, while I am reading I may not be back too soon…but I hope to have other things to share while I read.

Thank you for stopping by… I hope you find time to stitch today!

ttfn…sue