
Over the week-end went to a bead show, bought some beads for projects (like I need more projects), but like I say want has nothing to do with need., so I indulged myself. Funny thing is when I got home I remembered I had purchased a bead project last year. But do you think I have found where I put that project? A blog all of its own! I’ve looked a few places but still haven’t found it, but it will turn up…maybe much later. Anyway had a good time at the Bead-Blast.; look forward to next year.
Also went to out 1st art fair of the year. Brookside annual art Fair was this week-end (http://www.brooksidekc.org/art-annual) 32 years and I bet I have been to most. It is just a fun way to spend the afternoon or evening. There is always something to see and I usually come home with something too. This year I did not get anything but the art was very inspiring and my two favorites were Gwen Bennett’s Feather Art (http://gwenfeathers.com/)…these were beautiful. And after I got home and read about her art was even more impressed. And my other favorite was Julie Powell Beading (https://www.juliepowelldesigns.com/)…I will never be this good. Two reasons: My first love is needlepoint and I just don’t have the time or patience.
But it was a beutiful week-end (no rain) and we had fun.
I left most of the attachments, bullion knots and all the beading to the very end, I didn’t want to take the chance I would catch other threads on them and either snag the thread or worse still pull the embellishment or bead out of whack.

I have several Bullion knot needles I got from needlework shop. Colonial Needle distributes them and I blogged about them a couple times (https://sudukc.wordpress.com/2015/02/08/hari-kuyo-broken-needle-celebration/ ) or (https://sudukc.wordpress.com/category/needlework-tools/needles-needlework-tools/bullion-needle/). These needles are a size 20 and so they make a pretty good sized Bullion Knot.
 I started with the Letter “K”. I decided the Bullion Needles were too large for the curly-q on top of the pumpkin and the bird’s feet, I used a #24 Tapestry needle. I stitched the curly-q before I stitched the birds feet; it is a very long bullion and I gave it a twist or loop. After curly-q I added the bird’s feet, more Bullion Knots that I stitched over and around the green curly-q, still using the #24 needle. I left the curly-q above the bird’s wing and the wing to apply later.
I stitched the red veins for the eyeball in Bullion knots using the long Bullion needles I stitched these into a center whole that I had enlarged with and awl (or larger Tapestry needle) to accommodate the eyeball I would attach later. Notice these veins go over the outline of the letter
 Next Letter “C” and the legs of the spider. I used a #24 needle here too as I wanted the legs to be small.
And finally the Letter “I”, this had almost the whole top half of the letter unstitched. Using a Bullion needle I made a short Bullion for the top of the pumpkin at the bottom of the “I”. Then I made Bullions using the Bullion needles and made them looser than normal so they looked like curls. I made some at the top of her head too and these I made tighter so the brim of the hat could lay over them.
Then it came time to tackle the hat and flower on the Letter “I”. The hat was a padded ultra-suede applique with beading. I decided to applique the hat and only to tack the brim at the left side outside the letter and the right side on the tip also. The right side is also held in place by the flower. Next I did the ruched petals of the flowers using a flat braid thread and pulling one of the plies. I left the hat beading and center of flower until I was finished with all the letters.
 Two of the areas had a memory wire thread applied to the canvas;
  the pumpkin in the “W” and above the bird in the “K”. Memory wire thread is a thread with a fine wire hidden within it; some wires the wire is like one of the plies and other wire threads are wrapped wire with thread. I don’t know that one is any better than another, this was the first time I had used them. My only experience with wire before had been to use in finishing to make an ornament bend, so it looked like ribbon candy. First I cut two 3-4″ pieces of the memory wire, then I wrapped them tightly around a small knitting needle. I could have used the Bullion needle, a #18 or 20 Tapestry needle, or even the end of a laying tool; just anything that would coil the wire. On one end, I pulled enough back out straight to tie an Overhand Knot close to the coiled thread at one end; I also placed a small drop of Fray Check on the end to keep it from coming loose. I threaded a #26 needle with 1 ply of matching floss (you could use matching sewing thread) to secure the wire in place on the front of the canvas as well as to secure the tail to the back of the canvas.
To place the wire on the pumpkin on the “W” and above the bird on the “K” I used an #18-20 needle or laying tool. I opened a space in the canvas to plunge the open end of one of the wired threads to the back of the canvas. I pulled the wire to the desired length and secured with at least one couching stitch on the front; then I turned the canvas over, left about an inch and half, cut excess and tacked the remainder securely to back of canvas.
 Beading: There were two types of beads on this canvas; regular size 11 or 15 seed beads and then glass eyes on long pins. Go to Etsy and search for glass eye beads on a long pin, they come in all sizes and colors. Here’s one place: https://www.etsy.com/shop/TheWoolenWagon?ref=l2-shopheader-name. I’m sure you could find even the one used for the eyeball in letter “K”; I had smaller green one for the cat’s eye in letter “W”, larger green pair for the witch in letter “I” and amber ones for a bat in letter “D” and a solid black one for the bird in letter “K”. These all came in the thread kit, so I don’t know the sizes. You were to place these in the proper place through the front of the canvas, with needle nose pliers bend the wire down into place and the secure with thread on the back. Since I had never done this before I was a bit apprehensive…I didn’t want to get into the wrong place on the front, break a pin bending it on the back, or after I secured to back finding the bead looked wrongly placed on the canvas. You guessed it, I left these until I could do nothing else.
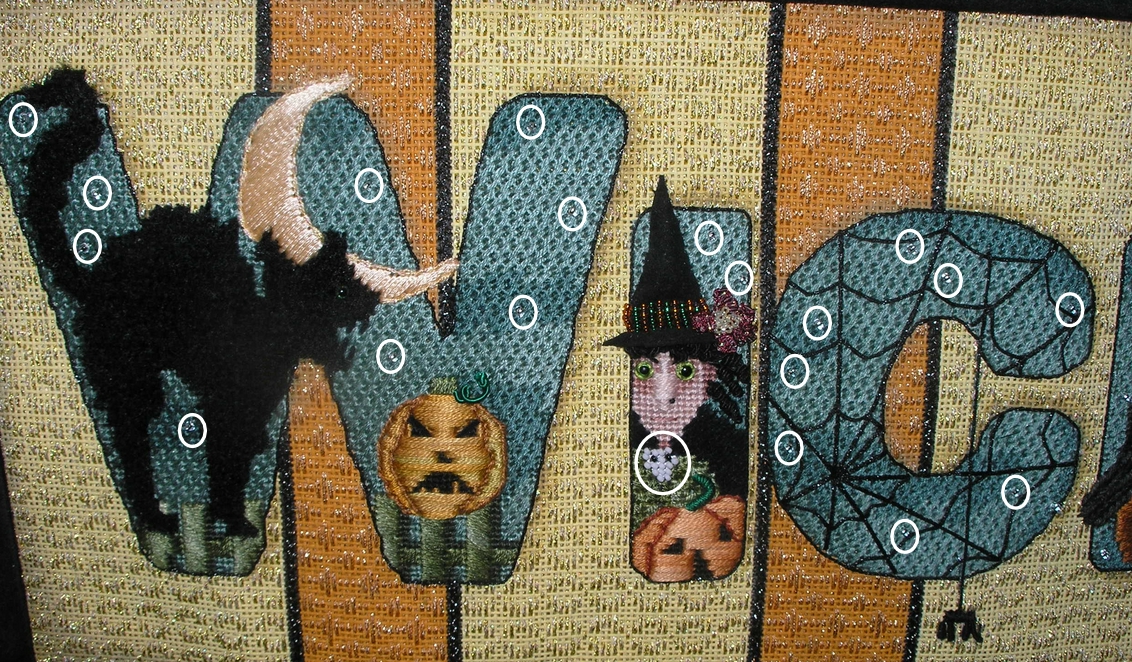 I first did all the stars on the letters, then the bat eyes on letter “D”, and the skull on the witch’s dress on letter “I”. For the stars, bat eyes and skull I used the double thread, lasso method. I referred to the unstitched pictures of the canvas for placement of the stars; I did move a star to the nearest over one stitch of the Nobuko so I did not disturb the over 3 stitches. The other beading was on the letter “I” were the center of the flower, and it was just
  piling beads up to make a center. Then there were the beads on the hat, they were supposed to be Peyote stitched but at that time I did not know how to Peyote stitch (I just learned last week); so I just strung five beads by row and stitched them on the hat.

And then I attached the wing of the bird. I attached it at the top, poked the wires through the canvas , bent the wired down and secure with thread to stitching on the back. Then on the front I bent just a bit to give the curve of the wing.
 When there was nothing left but the glass eye beads I tackled them I started with the cat in letter “W” because I figured if I broke this bead I could use a metallic braid and make a French knot. Then I did the bat in letter “D” and the black eye in the bird of letter “K”, same thinking here. By know I was pretty sure I could do this and so I did the witch’s eyes letter I and then the big eyeball in letter “K”. They all turned out well, the big eyeball has a tendency
  to flop but I’m the only one it seems to bother.
And “Wicked” was stitched!

Thank you for stopping by, I hope you have time to stitch today.
ttfn…sue

It looks terrific, Sue–congratulations on a great finish!